
We are gearing up for Christmas, and what’s a better project than a Christmas Gnome! We love the new trend of Christmas Gnomes as Seasonal Scene displays in houses, offices, storefronts and more. I personally adore the little critters because they can be customized so easily, and they’re perfect to make with a beginner sewist. We put together this super easy tutorial for beginners on how to create your own Christmas Gnome.
Tools & Materials:
**Note: these fabric amounts are to make Gnomes with a Tube approximately 3 ½” tall by 2” across. Read steps 1 and 2 to see how to measure for your tube size. Fabric estimates may allow leftovers to make additional Gnomes.
1. Cardboard Tubes (empty toilet rolls or ask your local fabric store if they have extra fabric tubes to use!)
2. Felt Squares or 15cm (6”) of Felt (for hat)
3. Quilting Cotton 20cm (8”) by 115 cm (for main body)
4. Faux Fur scraps or 15cm (6”) (for beard/hair)
5. Hot Glue Gun and Glue sticks
6. Fabric Glue
7. Wooden toggles, buttons, pom-poms (for nose)
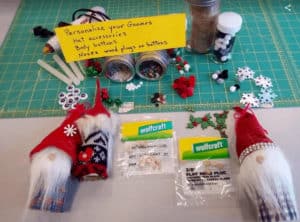
8. Googly Eyes, bows, buttons, anything you would like to accessorize your Gnome with. Get creative!
9. Fabric Scissors, Optional Pinking Shears (Exacto blade can be used to cut faux fur)
10. Sewing machine, or hand sewing needle and thread
Instructions:
Step 1: Cut Felt for the hats to be 6” by 4.5” into a triangle shape. This was the perfect size for the tubes we used for our project. To calculate the fabric size you need for your own tube, take a measuring tape and wrap it around the circumference of the tube, allowing for a small overlap (this will be your seam allowance). The circumference will be the ‘base’ of your hat (6”) and the height of your hat is up to your own discretion.
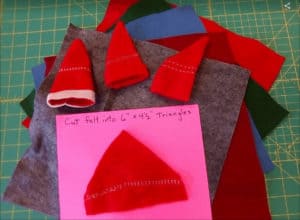
Sew the hat together by putting the two open ends together until you have a cone shape, sewing all the way up to the point. Make sure to leave a circular hole at the bottom for your tube. Turn the hat inside out to hide the seam.
We added an embroidered design across the bottom of our felt before we sewed it all together. This added a little flair to our hat! But it is not necessary.
Step 2: Cut your Cotton Fabric into strips with pinking shears to dissuade fraying. To measure how much fabric you need for each Body of the Gnome measure out the circumference again, and add a 1” seam allowance for the length. Then measure out the height and add 3” to each end.
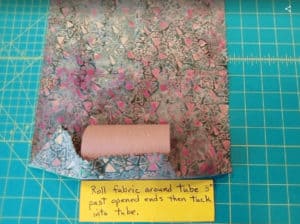
Our finished fabric size was 7 ¼ ” by 9 ½”.
Step 3: Roll the fabric around the tube, you can use a small amount of fabric glue to hold the fabric in place as you roll it. With the small amount of layover of the fabric, either use fabric glue or hot glue to seal the fabric down.
(Fabric glue lasts longer, but takes longer to dry)
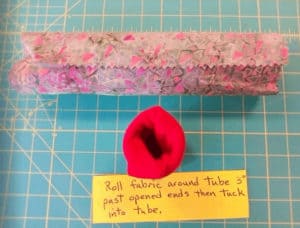
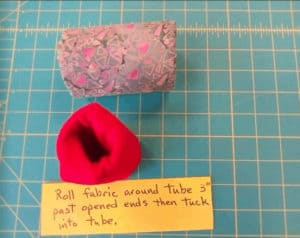
Step 4: You should now have a cylinder. Tuck the ends of the fabric into the tube creating a scrunchy effect. Seal the fabric down with fabric glue or hot glue on the inside of the tube (between the cardboard layer and the fabric layer.)
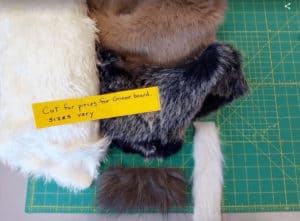
Step 5: Cut your Faux fur into the ideal beard size and shape! This varies for the size of tube you have, and what effect you would like to achieve. We created this handy video on how to cut Faux Fur, so if you’re unsure how to cut Faux Fur or you want to learn how to cut down on the fluffy mess give the video a watch. https://www.youtube.com/watch?v=MabNfyuMDwk
Step 6: Glue your Faux Fur beard to the top rim of the fabric tube you’ve covered. This will be hidden by the hat once it is in place.
Step 7: Glue the hat in place over the top of the tube, covering the glue line for the beard and sealing off the top.
Step 8: And just like that you’re ready to accessorize! We added little wooden toggles for the nose and a few crafty buttons to the hat and body of some of our Gnomes. Get creative!
Your Gnome is ready to party with all the other Gnomes now! This is a super easy, and fun craft to do in an afternoon with a loved one, or a beginner sewist! Share with us the fun scenes and Gnomes you’ve created for the season. Happy Holidays!