We’re following a cute new trend by bringing back some 50s and 60s aesthetics! Ascots are a simple, and stylish way to make any outfit feel a little more dressed up. Or, using a denim or cotton print as a bandana around the neck to make an outfit more playful. We put together 2 simple DIYs to show 2 different methods on how to sew an ascot.
How to sew a simple top stitch ascot!
Materials
- 8-9” of Chiffon (or other light weight material)
- 2 yards of ribbon/cord/flat lace/bias tape
- Matching thread to both the fabric and the cord
- Scissors
Sewing Instructions
Step 1: depending on how wide your fabric is and how long you want your ascot to be will effect how long you cut it. I wanted a short ascot so I measured around my neck and allowed for 3-4 extra inches at the end to tie the ascot. In total I cut my fabric to be 27” long by 9” wide.

Step 2: Make sure your fabric is evenly cut on both ends. Do this by folding the fabric over on itself and trim off any excess.

Step 3: Fold the fabric over again to you have 4 layers of fabric. Measure from the top inner corner of the fabric and mark a straight line at a 40/45 degree angle. Cut on the line.

Step 4: When you open your fabric you should have a point. I wanted my ascot to have a triangular end, but you might decide to have it remain square.

Either way, take your fabric to the machine and start by doing a single fold hem. With a chiffon you want to go slowly and provide gentle tension on the fabric to allow it to feed through the machine evenly. I would suggest using a matching colour thread at this point. I used a contrasting thread to show details for this DIY but it does not look at neat as a matching thread would.

Step 5: Once you’ve done a single fold hem, go back to the machine and do another fold to get a double fold hem. This will keep your fabric from fraying since chiffon frays a lot. Alternatively you can use fray-check to seal the edges.


Step 6: Take your cord or ribbon and place it on the top of your ascot. Make sure to start sewing in the middle of your project on a straight section with a small amount of overlay. This will help hide any joins or seams.

Carefully sewing directly on top of your cord and through the fabric.
Step 7: When you reach the triangular point fold your cord back like you see in the picture to get a clean edge. I sewed directly off the cord, did not cut my thread, turned the cord as seen and then began sewing again.

And just like that, you’re done! You might want to put the fabric under a very light heat to iron your sides flat, but it will be mostly unseen when worn. Share with us what you created!
A second method you can follow involves using your serger. Follow along here!
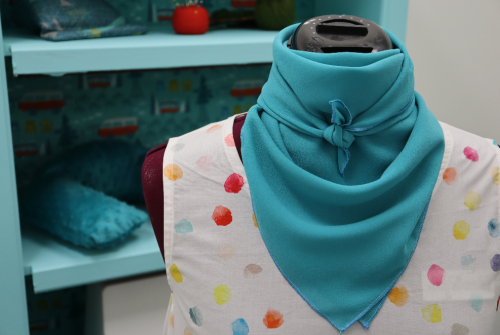
Using a rolled hem on a serger is one of the nicest ways to finish soft and drapey fabrics. The serger cuts a perfect edge, wraps the edge around a needle, and then surrounds the hem in thread, making it look like a satin cord. We have selected our Chloe Georgette in col. 30 for this project. It is a soft, slightly sheers fabric, with a sophisticated pebbly crepe texture and a gorgeous turquoise hue. It is available on our website (Item #18030). We are making a medium sized scarf (approx. 26” square (65cm)). We started with .75yard of fabric (69cm). The fabric is 60” wide which is wide enough to make one scarf for our selves, and one to gift to a friend!


The first step is to remove both selvedges. We did this with a rotary cutter, but you can use a ruler, fabric marker and scissors if you don’t have a rotary cutter. Then we cut off the ragged edges that run the width of the fabric. Our fabric had been torn, so we knew that we had a nice straight line and that the fabric was on grain.


Once we had pristine cut edges, we laid out our fabric and pulled the top right corner on the diagonal down to the bottom edge. We did this to create a perfect square. We made a small cut in the bottom edge to indicate the cutting line. Then we opened the fabric back up, brought the lower edge up to meet the top edge and cut through the two layers, to create our square.


We then prepared the serger for a rolled hem which included changing the regular needle plate to the rolled hem plate. We also removed the left-hand needle. We followed our instruction manual to make adjustments to the tension and the stitch length.


We then tested the rolled hem on a scrap of fabric, to make sure we were happy with how it looked.

Once we were happy with the stitch, we serged the first edge.


We then serged the next edge making sure we started with a nice long thread “tail”. This is important. You will see why in a moment.

Once we had serged all four sides, leaving long “tails” at each corner, we took a needle with a large eye and pulled the tail through the eye of the needle. We did this by creating a loop with a length of thread and used this loop to pull the tail through the eye of the needle. Once the needle was threaded with the “tail” we slid the needle between a number of stitches in our hem. We then pulled the needle though, which hid our “tail” inside our hem creating a perfect finish for our corners. We repeated this for the remaining corners.


Here is a closer look at the finished hem. A thing of beauty!


3 thoughts on “Spring Ascot D.I.Y.”
Great instructions! Can also use the scarf to hold those disposable masks close to your face.
Suggestions for serging rolled hems on chiffon (I do a lot of it):
1. Cut the fabric with a rotary cutter to eliminate those little tails left by scissors.
2.drop the blade on your serger. This allows for a slightly deeper roll and stronger hem.
3.Use wooly nylon in the upper looper. You will have to adjust your tension to make it run smoothly but the result is worth it.
And a side note for threading tail ends, Prym makes a tool designed just for this! I keep it with my serger tools.
Hello, what do you mean by “drop the blade on your serger“?
Thanks!
Hi Eli! When doing a rolling hem you remove the blade so it will not cut the fabric. Depending on your serger the blade “drops” below the sewing surface so it cannot engage with the fabric. When you need to use the blade again make sure to “re-engage” it! Hope that helps.