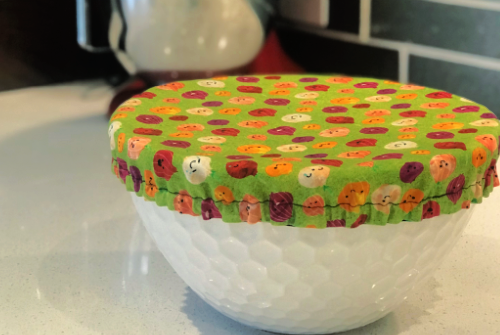
As you may well know, there is a bit of a baking craze going on. With people spending more time at home, many have been having fun experimenting with baking bread. In this tutorial, we will create a useful tool to help our budding bakers! You will find instructions to create a pattern and then cut and sew a customized bowl cover. This bowl cover will provide a cozy place to help dough rise. We’ve used contrasting fabrics for the outside and lining of the cover. What delightful fabrics will you use?

Fabric:
- .5 yards of 44” width (110cm) fabric is enough for one complete cover (face and lining)
OR
- .5 yards each of two CONTRASTING fabrics (same width as above) will allow you to make THREE complete covers!
(Please note these quantities are for a 10” bowl – if your bowl is larger, you may need more)
Materials:
- Scissors for cutting fabric
- Scissors for cutting paper
- Pencil and 2 Large pieces of paper (11” x 17”)
- Ruler
- ¼” elastic (to fit snugly around bowl)
- Measuring Tape
- Pins
- Sewing Machine with straight stitch
- Iron and Ironing Board
Let’s make a pattern!
1. Use your tape measure to measure the diameter of the bowl (top of the bowl at widest point).


2. Take one piece of paper (11” x 17”) and fold in half as shown.
3. Take the diameter of your bowl and add 4”. Our bowl has a 10” diameter so our calculation is 14”. Divide this number in half (7”) and measure the calculated distance from the folded edge. Make a mark on the paper at this point.


4. Pivot the ruler keeping the same distance from the corner. Make another mark. We are drawing a quarter circle. Continue to pivot the ruler and mark the quarter circle. The more marks you make, the easier it will be to cut your pattern.


5.Use your paper scissors to cut along the dotted line (through both layers of paper).

6. This is the completed pattern for the top layer of the cover. The straight line will be placed on the fold of the fabric in order to cut out a complete circle.


7. Now we will make the pattern for the lining (underside of the cover). Start by drawing a line ½” from the long edge of a new piece of paper. This ½” will be the seam allowance for the lining.


8.Take your pattern piece for the top of the bowl and line up the straight edge of the pattern with the line you just drew, as shown above. Trace the curved edge of the circle. Continue the line to the edge of the paper (at a right angle).


9. Cut out the pattern piece. You will now have a complete pattern for your bowl cover.

10.Place the first pattern piece on the folded edge of your main fabric and pin and cut. Place the second pattern piece on your lining fabric and pin and cut (IMPORTANT: this piece is NOT cut on a fold).

11. I repeated this process in order to make two covers – One for me and one for a friend!


12. Line up two of the lining pieces right sides together. Using a ½” seam allowance, stitch along the straight edge. Leave a ½” gap in the stitching ½” from one end. This little opening will be used to insert our elastic later. Leave an approximately 3” gap in the centre of the seam. This opening will be used to turn the cover right side out.


13. Press seam open in lining and place lining right-sides-together with face fabric.


14. Pin together around entire edge and then stitch with ½” seam allowance around entire circumference. Let your final few stitches overlap your first few stitches.


15.Trim the seam allowance to approximately ¼”.


16. Pull the ‘face’ fabric through the opening you left in the lining.


17.Once the cover is fully turned right-side-out roll the edge of the cover between your thumb and index finger to make sure that the seam is fully turned. Press the edge.


18.With the ‘face’ side of the cover facing up, topstitch with a ½” seam allowance around the entire edge of the cover overlapping your last few stitches with the first few stitches.


19.Fold the end of the elastic. Place a safety pin through the folded end. Slide the safety pin into the opening in the lining at the edge of the cover.


20. Work the safety pin through the casing and slide the pin back out through the opening. Do not let the other end of the elastic slip into the casing! Adjust the size of the elastic so that it fits snuggly over the top of your bowl. Trim elastic to this size.


21.Overlap ends of elastic, making sure that it is not twisted. Stitch securely together. Adjust elastic so that it is evenly distributed through the casing. Slip stitch the little opening closed.

22. Slipstitch the larger opening in the lining closed. Enjoy your new bowl cover and happy baking!

Hope you enjoyed this helpful bowl cover tutorial!


5 thoughts on “D.I.Y. Bowl Cover, perfect for Baking Breads!”
Hi, I was wondering why I can’t see the pictures for the instructions. I tried three different devices and they are all the same. Is it possible they are not available any more? Thanks!
Hi Veronica! Thanks for pointing out this issue. I’m not sure what happened with the images here. We’ll update the blog post asap. Thanks!
Thanks, Dev! I can see them now.
I am not sure why the lining is cut into 2 pieces? What is the advantage instead of just cutting 2 circles?
It is so you do not need to leave a seam opening around the edge where the elastic should be! That way you can turn your circle inside out via the middle seam instead for a cleaner finish. You can see this in action in Step 16!