It’s the holiday season and that means holiday parties! Wine, champagne for New Years, birthdays and anything else you can think of deserve a beautiful package. This wonderful tutorial shows you how to make an elegant bag for any bottle so you can gift it, and the recipient can keep on gifting! Follow along with us as we lay out the simple steps in creating a beautiful puffed collar wine bag.
Supplies needed:
1) For the bag, cut one piece 13″ x 22″ (33cmx56cm)
2) For the casing, cut one piece 2″ x 13″ (5cmx33cm)
3) Matching thread
4) Ribbon, about 30″ long, 3/4″ wide (76cm @ 2cm wide)
5) Point turner (chopstick, pencil, etc)
6) Bodkin (a blunt needle with a large eye for drawing tape or ribbon through a loop or hem)
7) Fray Check (optional)
(In total for fabric you will need 1 type of fabric at 40cm (depending on the direction of the pattern and grain of fabric you may need 60cm). We used Organza for our fabric, but you can use quilting cotton, satins, etc. We do not suggest using a very heavy fabric (like duck canvas) since turning the corners can become difficult, but almost any fabric can be used for this tutorial)
Sewing Instructions: 1/2″ Seam allowance
1. Lightly apply fray check around the edges of the fabric to prevent fraying. This step is optional. If you have a serger, you can serge around the edges as well.
2. To make the collar, place the bag right side facing up, mark and fold down 12″ from the short end. This will be the neck of your collar. Pin the two sides of your collar.


3. Sew the two sides and backstitch. Turn right side out. Using a point turner, try to get the points of the collar nice and sharp. Press. You should now have a pocket with a long flat bit of fabric.


4. Bring the 2 sides of the bag (the unsewn remaining fabric), right sides together and pin, matching seams. Pin 1 1/2″ beyond the previously sewn seam as shown, making sure not to catch the collar hem. Sew the sides and the base of the bag. Backstitch. Press the sides and base seams open.


5. Now to do a little bit of origami! The base of your bag when laying flat looks like a rectangle, but if you pick it up and pull the base away from the seams it will create a two excess triangles.
To make the boxed base of the bag, bring the corner of the bag into a triangle as shown.

Measure and mark 1 1/2″ from the tip and stitch. Backstitch. Trim to 3/8″ seam allowance. Repeat for the other corner. Apply fray check to the cut edge (optional).

7. Turn bag right side out. From the fold edge of the collar, mark 4 1/2″ down as shown. Set aside.

8. Now to make the casing for your ribbon. Take your long strip of fabric (the second fabric cut you made) and mark 3/8″ on the long side and 1/2″ on the short ends. Fold and press. Finished length approximately 1″ x 12″ . You are essentially making a single-fold bias tape that will be attached at the neck of the bag.

9. Lay the casing on the marked 4 1/2″ line on the bag matching edges of the bag as shown. Pin.

10. Stitch around the bag, securing the casing to the neck of the bag. Repeat on the other edge. You can do this by hand or with the machine.

11. Using a bodkin, thread your ribbon through the casing.
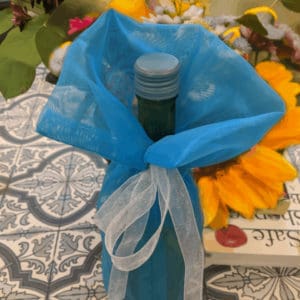
Congratulations! Your wine gift bag is finished! You’ve made a truly elegant and long lasting bag that adds just a bit of extra love to any gift you’re giving away. I simply love jazzing up a simple gift like wine with something personal (because let’s face it; as a sewist, unless I’m brewing the wine myself, I always feel like I need to make my gifts more personal.) Hope everyone found this tutorial helpful, and if you need any more information, feel free to leave us a comment.
Happy Holidays and have a wonderful New Year!