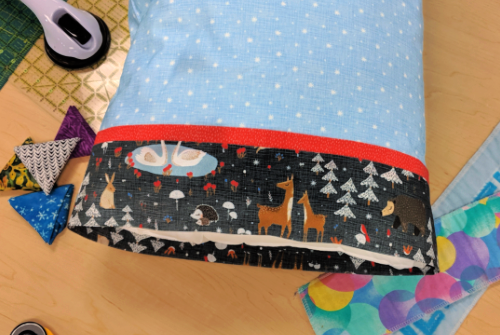
The pillow case: It’s something that most of us use every day (or at least every night!) This pillow case is a great beginner project because there are no curves to stitch and no serger required. It also makes a great gift. We have made our pillow case with a very sweet winter theme, but you can customize the theme of your pillow case for its intended recipient: cupcakes, butterflies, honeybees, sports, motorcycles, teddy bears, Eiffel towers, stars, or unicorns! With all of these amazing possibilities, we’d better start sewing!
If you are sewing for Ryan’s Case for Smiles, be sure to double check the guidelines here.

Here’s what you’ll need:
- Main Fabric: 7/8 yard
- 1st Contrast (for flange): 3/8 yard
- 2nd Contrast (for “piping”): 1/8 yard
- Ruler, chalk and scissors OR ruler, rotary cutter, and cutting mat
- Thread to match main fabrics
- Pins
- Sewing machine with straight stitch
- Iron and Ironing Board
(Finished dimensions are approximately 29.5” x 20.5”)
Cutting:
From main fabric, cut 27” (approx 70cm) by the WOF (width of fabric).
From 1st contrast fabric, cut 9” (approx. 23cm) by WOF.
From 2nd contrast fabric, cut 2.5” (approx. 6cm) by WOF.


Step 1.Prepare flange:
Take the 9” strip of the 1st contrast fabric and press it in half along the length with the wrong side facing in.
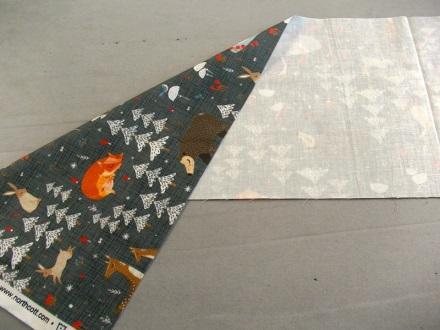


Step 2. Prepare piping:
Take the 2.5” strip of the 2nd contrast fabric and press it in half along the length with wrong side facing in.


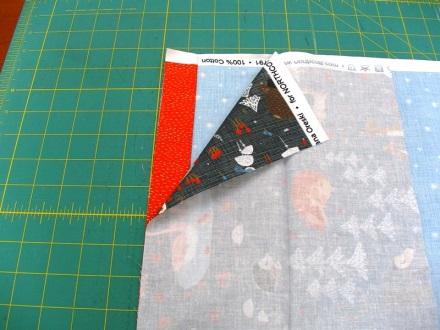
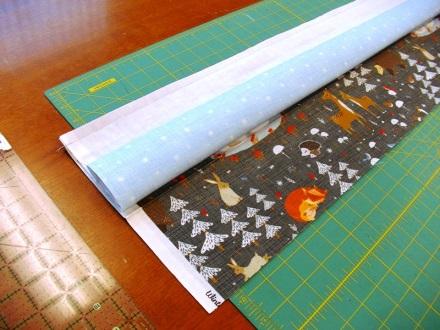
Step 3. Baste the three fabrics together:
Place the “piping” over one edge of the main fabric (face up) lining up the cut edges (as shown in first image above). Open out the “flange” and lay over top of these, again lining up the cut edges (second photo). Pin in place along the cut edge (third photo).


Step 4. Basting continued:
Using a basting stitch and a 3/8” (10mm) seam allowance, stitch all of the layers together along the cut edge, removing the pins as you go.


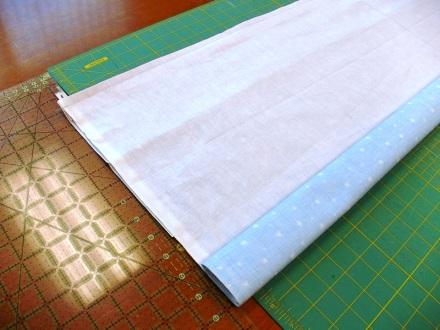
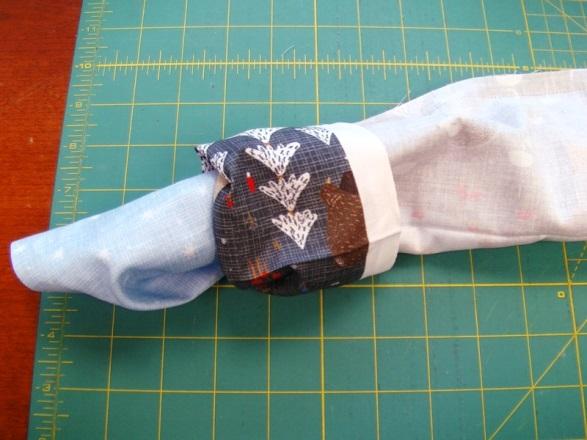
Step 5. Making a “fabric burrito”:
Lay your work on a table with the flange facing down. Roll up the main fabric in a fairly tight roll (see second photo above). Wrap the unstitched cut edge of the flange over the rolled up main fabric, lining up this cut edge with the edge that you have already stitched. Pin along this edge (third photo above).

Step 6. Stitch your “fabric burrito”:
Stitch along the pinned edge using a regular straight stitch with a ½” (12mm) seam, removing the pins as you go. Your fabric burrito will look like the second photo above.


Step 7. Grading seam:
Trim the seam allowances to various widths as shown above. This will help to reduce bulk at the seam.


Step 8. “Turn, turn, turn”:
It’s time to turn your fabric burrito right side out. Gently pull the main fabric through the flange at one end. Continue to do this until the main fabric is completely released. Unroll the main fabric. Your project should look a lot more like a pillow case at this point!


Step 9. Press on:
With the main fabric facing up, press the seam open while gently pulling on the flange. The piping will lay toward the main fabric. Then, turn your work over and do the same thing again.


Step 10. Fold, trim and pin:
Fold your pillow case in half with the wrong sides of the main fabric facing in. Using a rotary cutter or scissors, trim off the selvedges. Place pins along the two cut edges.


Step 11. French seam Part 1:
Stitch along cut edges using a 1/4” (6mm) seam allowance and pivoting at the corner. Trim seam allowance at the corner.


Step 12. French seam Part 2:
Turn the pillow case inside out and press along the edge you just stitched. Then stitch again along the same seam with a 3/8” (1cm) seam allowance.


Step 13. Last step:
You’re almost done! Turn your pillow case right-side-out and press. Your pillow case is now ready to enjoy. Sweet dreams!


1 thought on “Novelty Pillow Case”
This looks great I am going to try it.