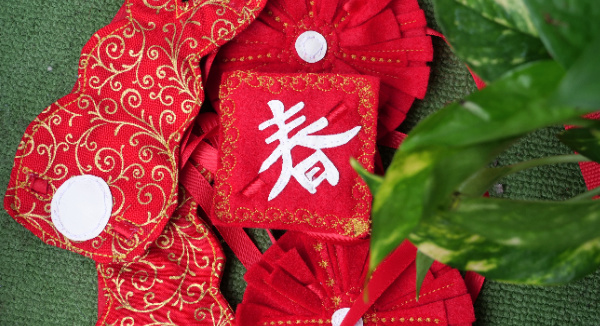
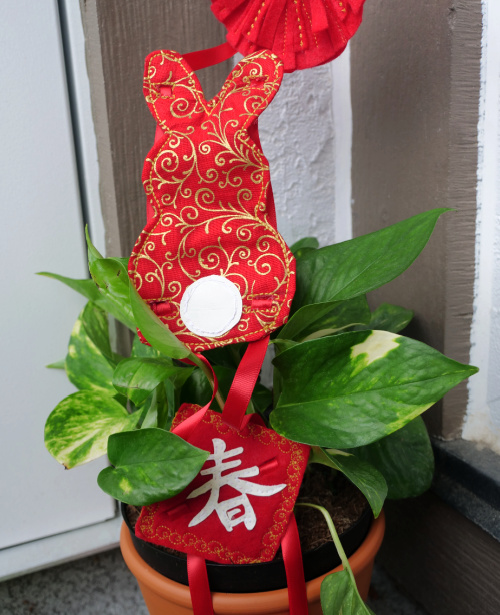
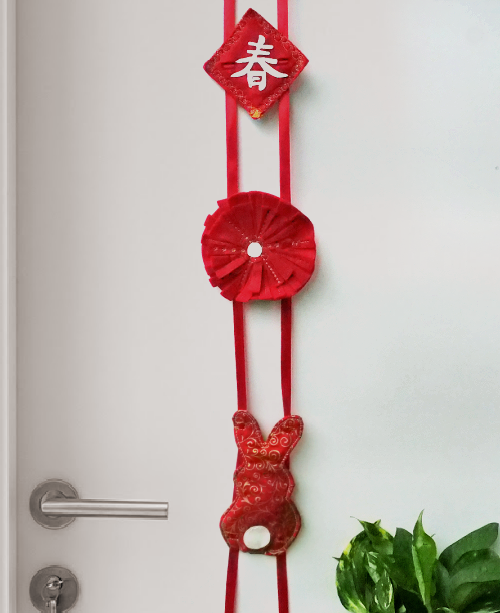
Gong hei fat choy! Happy Lunar New Year to everyone! Whether you’re new to celebrating Lunar New Year (or Chinese New Year) or you’re a seasoned celebrator, one of the best ways to get ready for the festivities is to decorate your door to bring in the new year and spring weather. We put together this easy DIY to elevate your door decor and help celebrate in style. Plus you can use it again and again each year! This year is the year of the Rabbit so it features adorable bunny decor, but you can easily switch the Rabbit motifs out for a Dragon, Sheep, Pig, or Tiger to coordinate with the animal of the year.
What you’ll need
- 1/4 yard of Red Felt
- 1/4 yard of Coordinating Medium Weight Cotton (We used the fabric Holiday Flourish)
- White Faux Leather or White Felt (6″x6″ at a minimum)
- 3 yards of 1/2″ Red Ribbon
- Matching thread (We used Gold, White, and Red)
- Adhesive Double sided sewing tape (narrow)
- Tailor’s Chalk or Fabric Marking Pen
- Hand sewing Needle
- Sewing scissors
- Paper cutting scissors
- A paper clip (medium-small size)
- Free Sewing Pattern (download below)
Of course you’ll also need a working sewing machine and iron. We have a machine that can do some fancy embroidery stitches, but this is not required! It can help make the Flower design more appealing, but a beautiful design can still be achieved with hand stitching, or a repeated pattern with a straight stitch.
Sewing Instructions
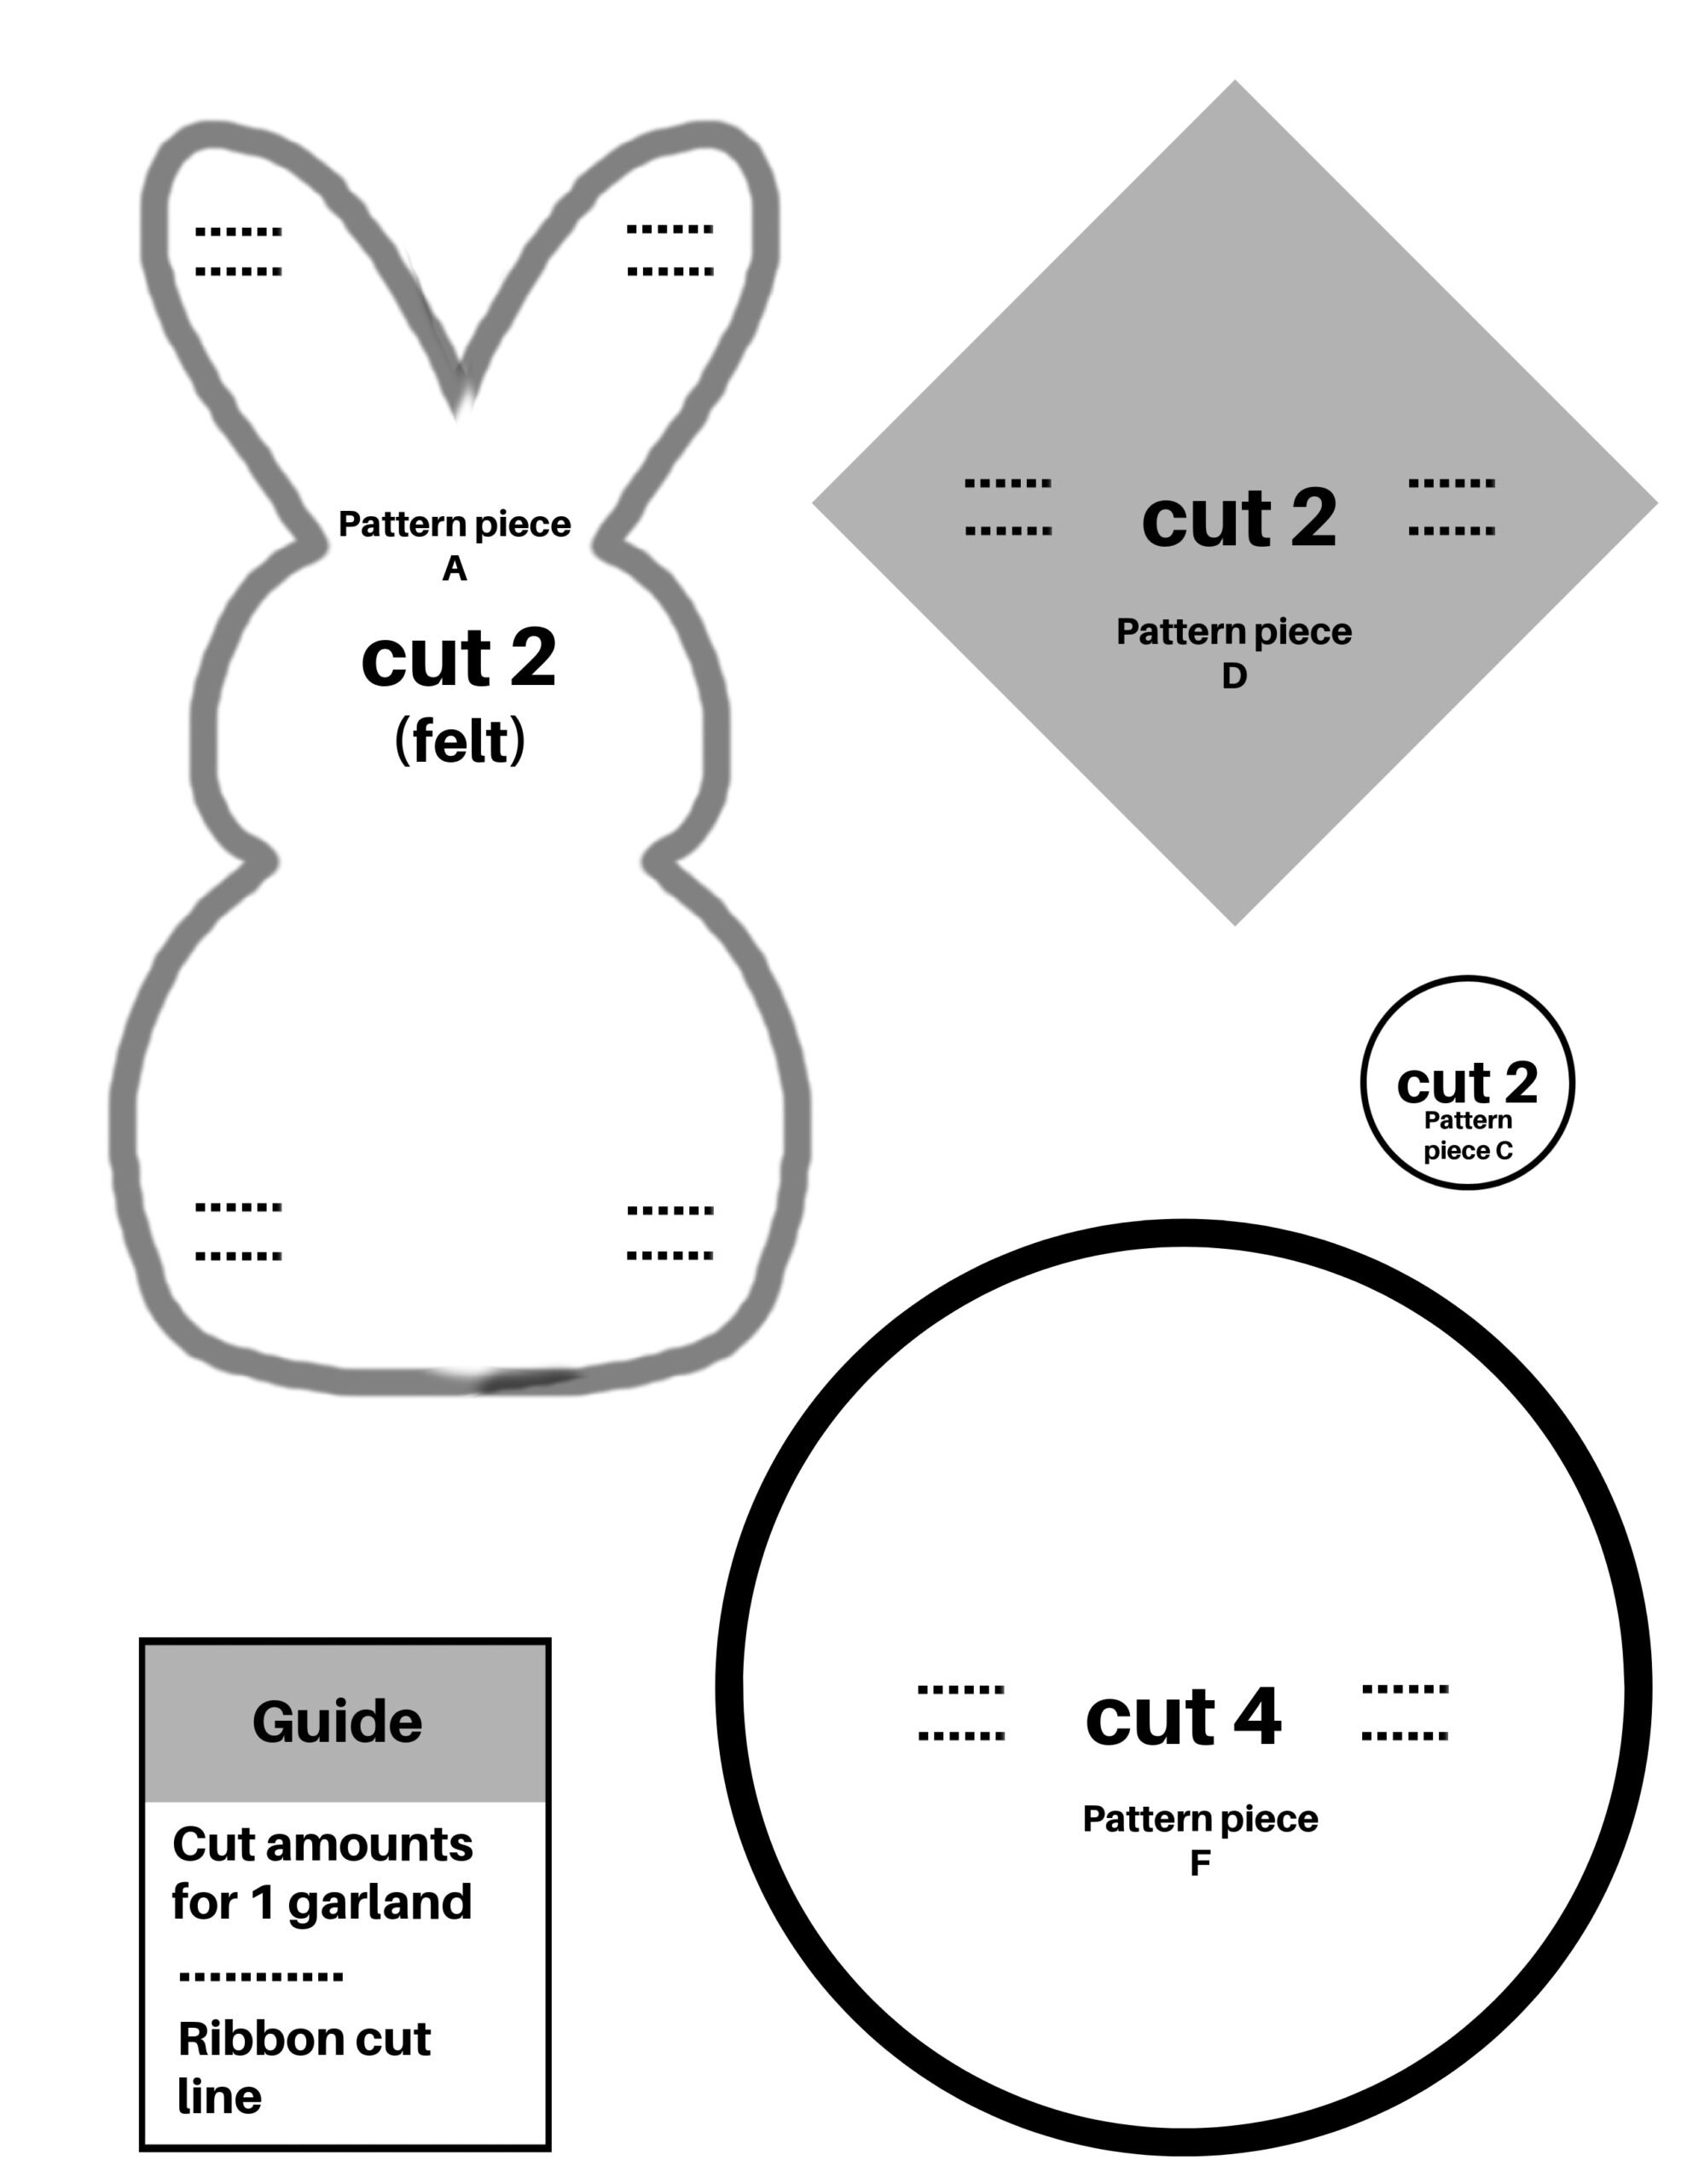
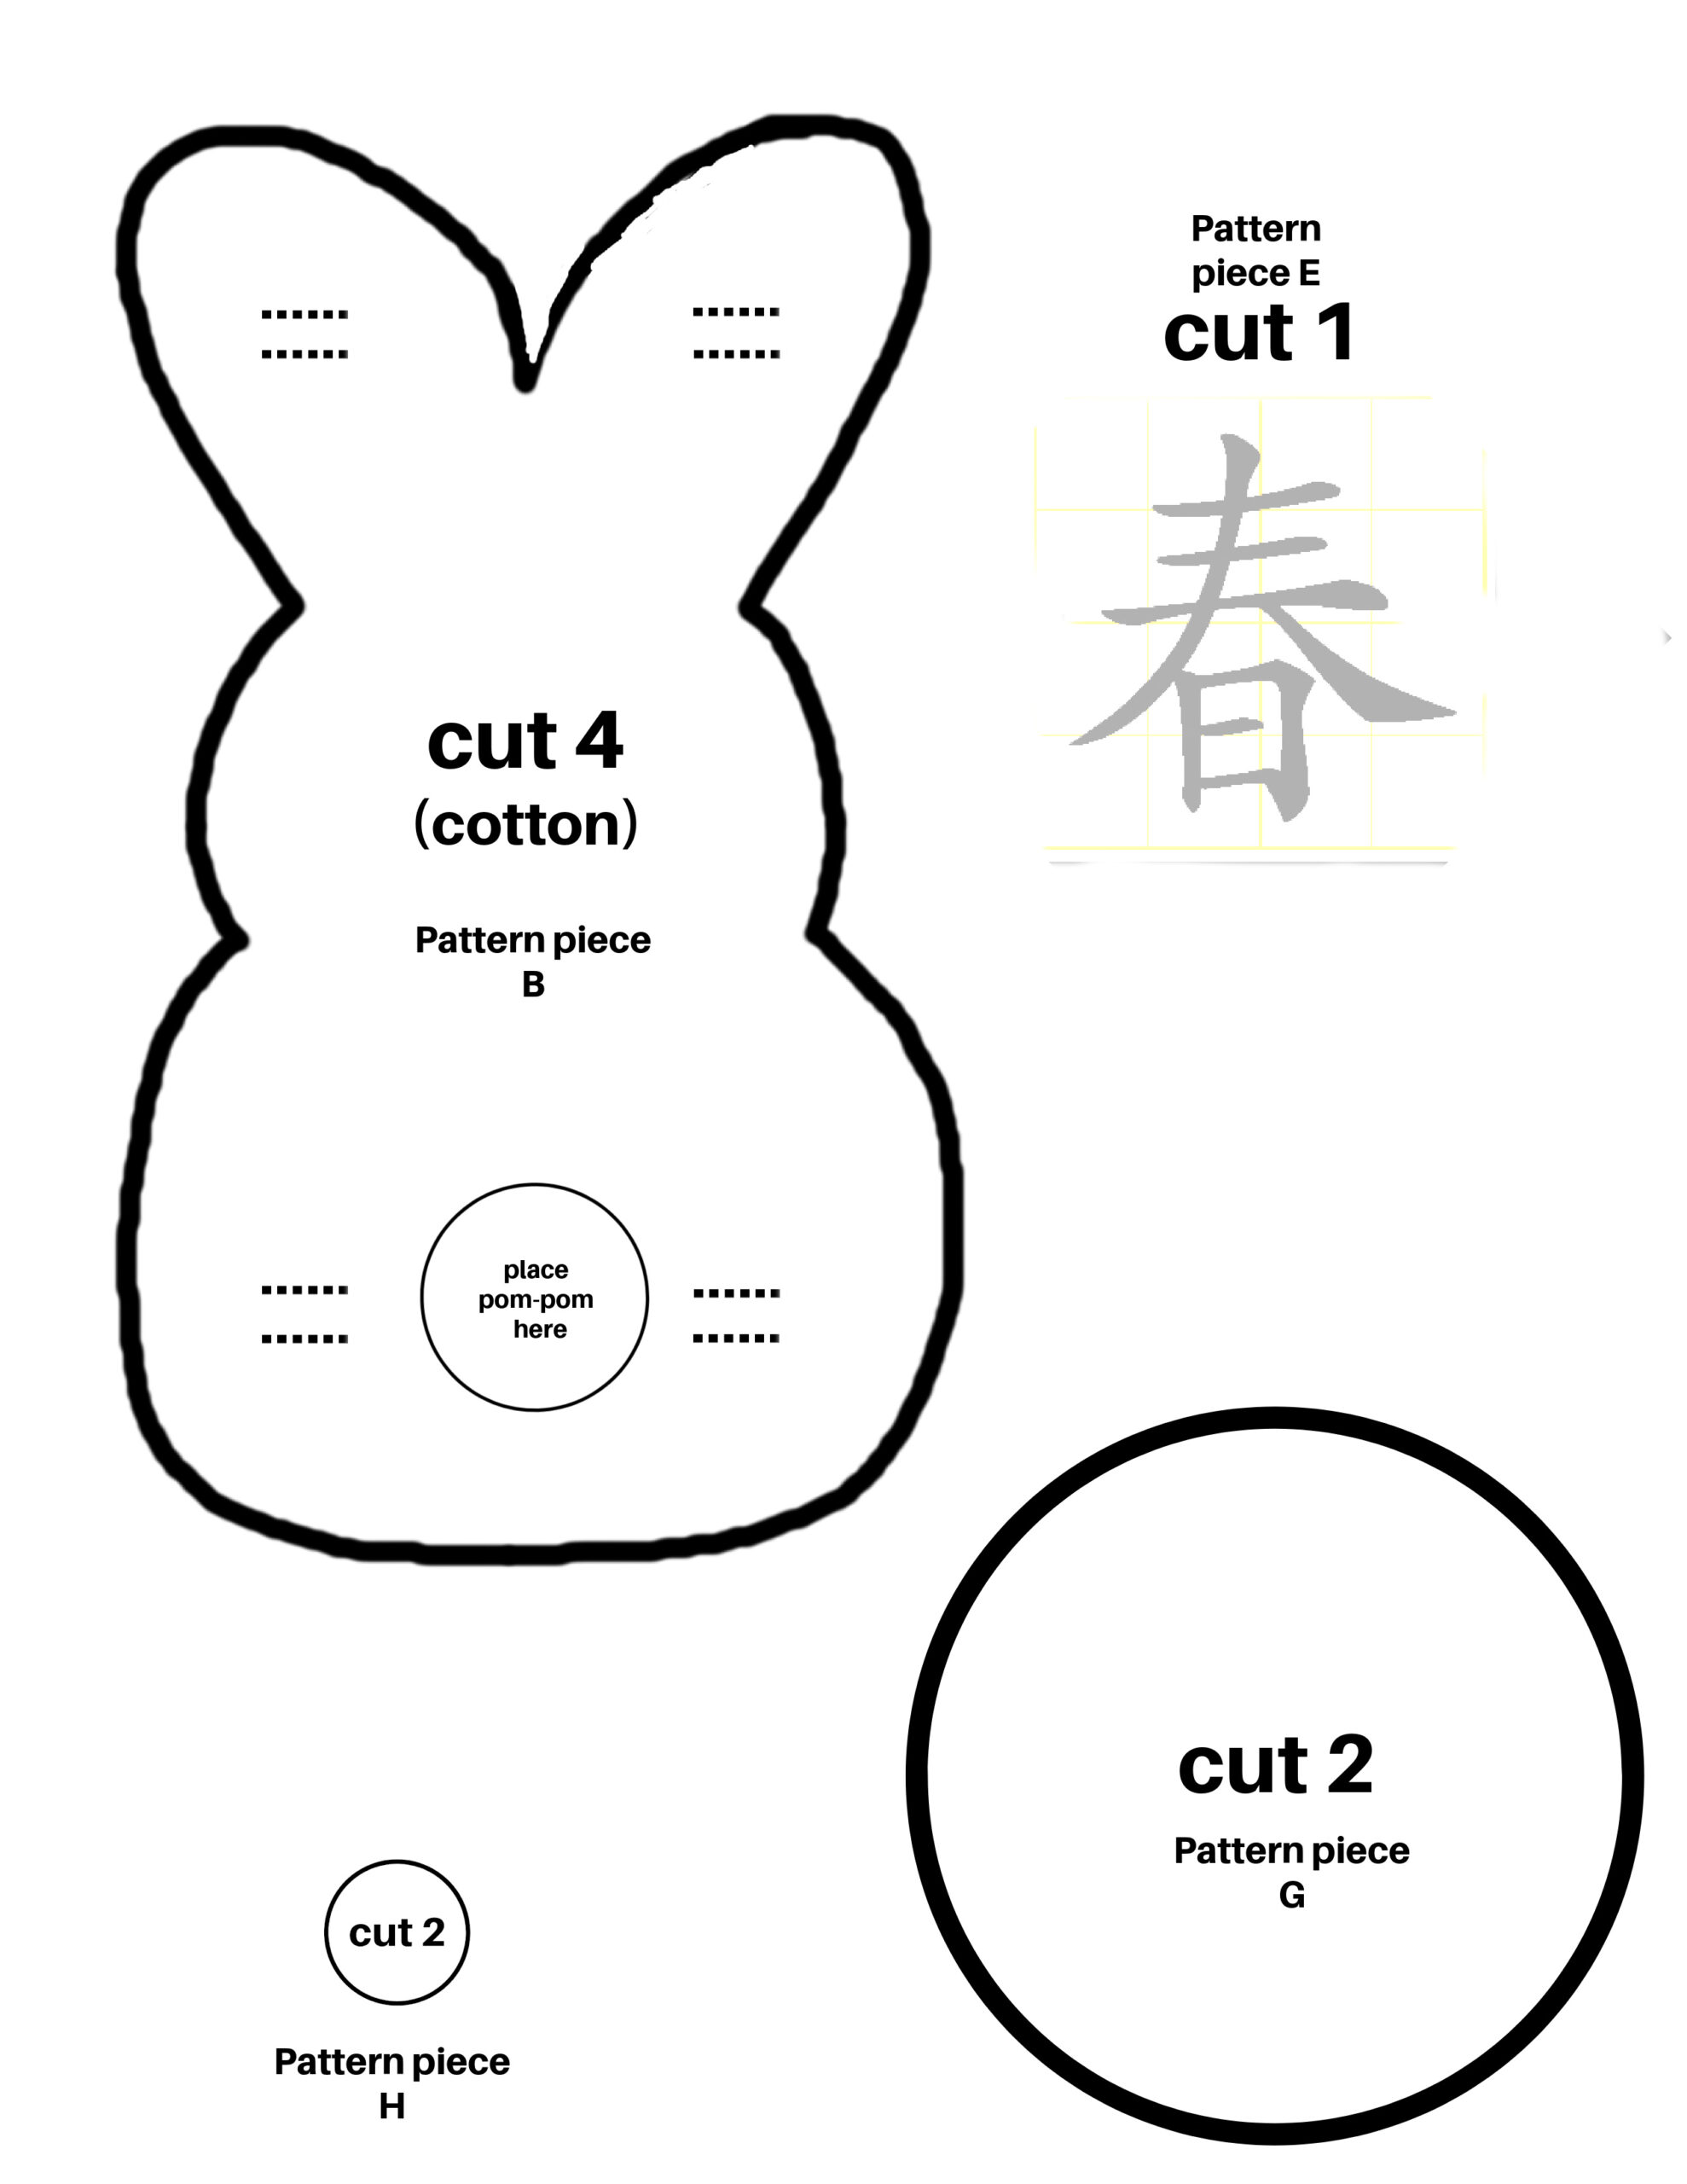
Step 1: Cut out your pattern according to the cutting instructions on the downloadable pattern.
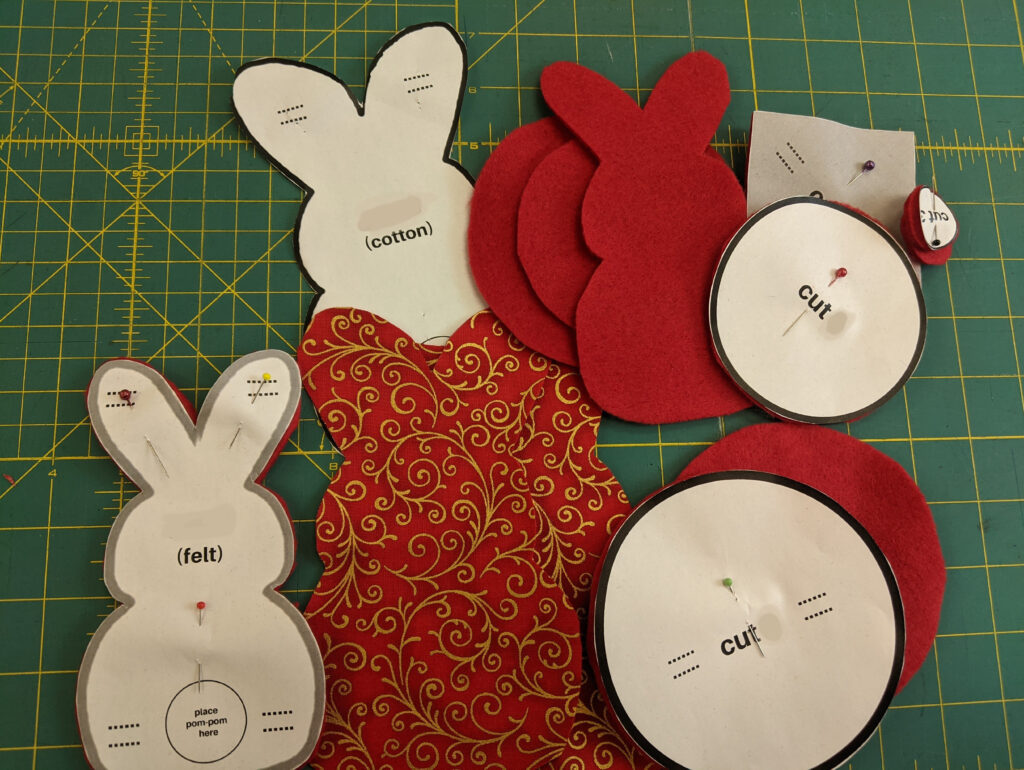
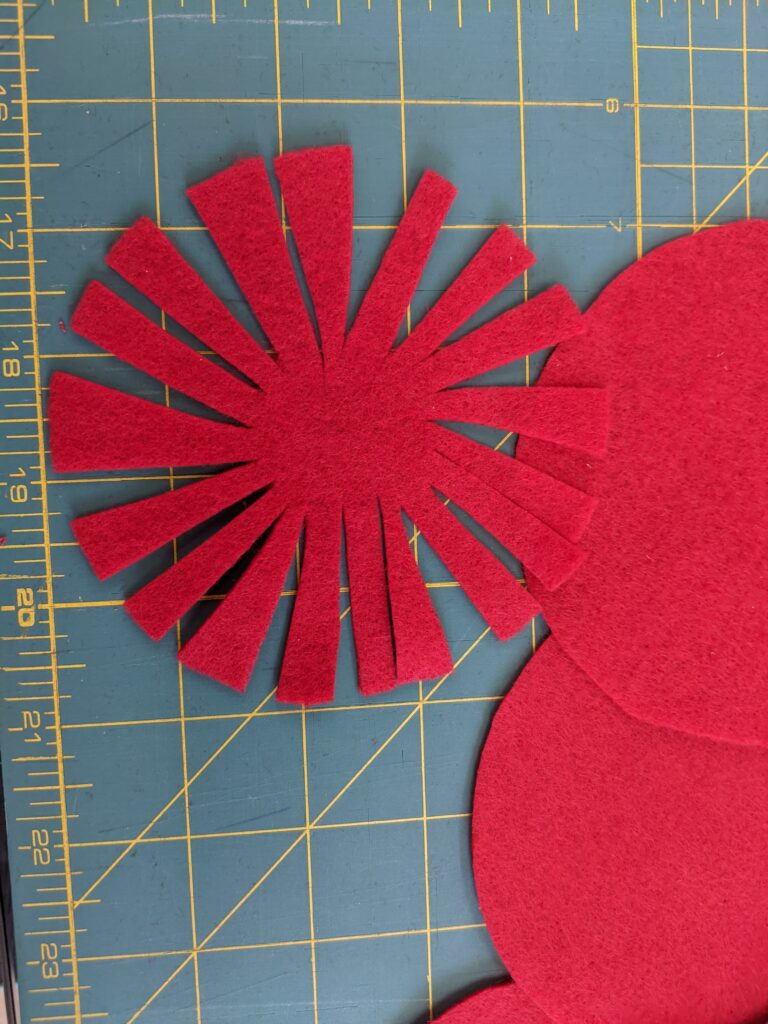
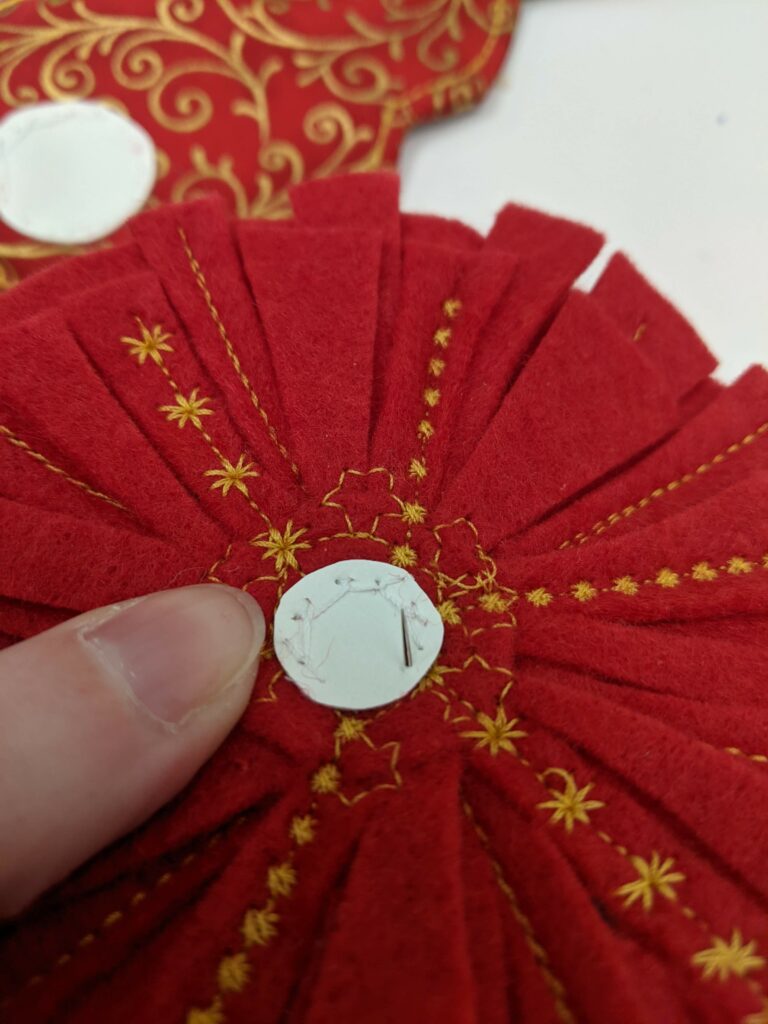
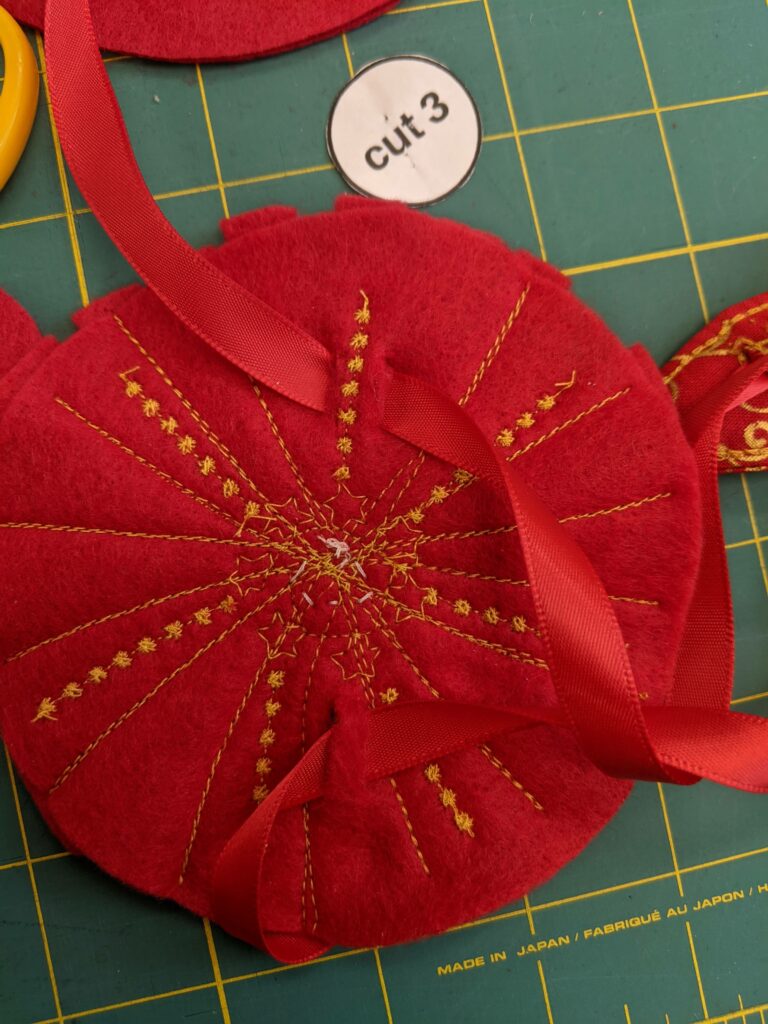
Start by taking 2 cuts of your “Pattern piece F” and cut out long triangle strips to create a flared, or flower like pattern. Repeat this for “Pattern piece G” as well. In the end you should have 1 full “Pattern piece F” circle without any cuts in it, 1 cut piece of “Pattern piece F,” 1 cut piece of “Pattern piece G,” and the full circle for “Pattern piece H.”
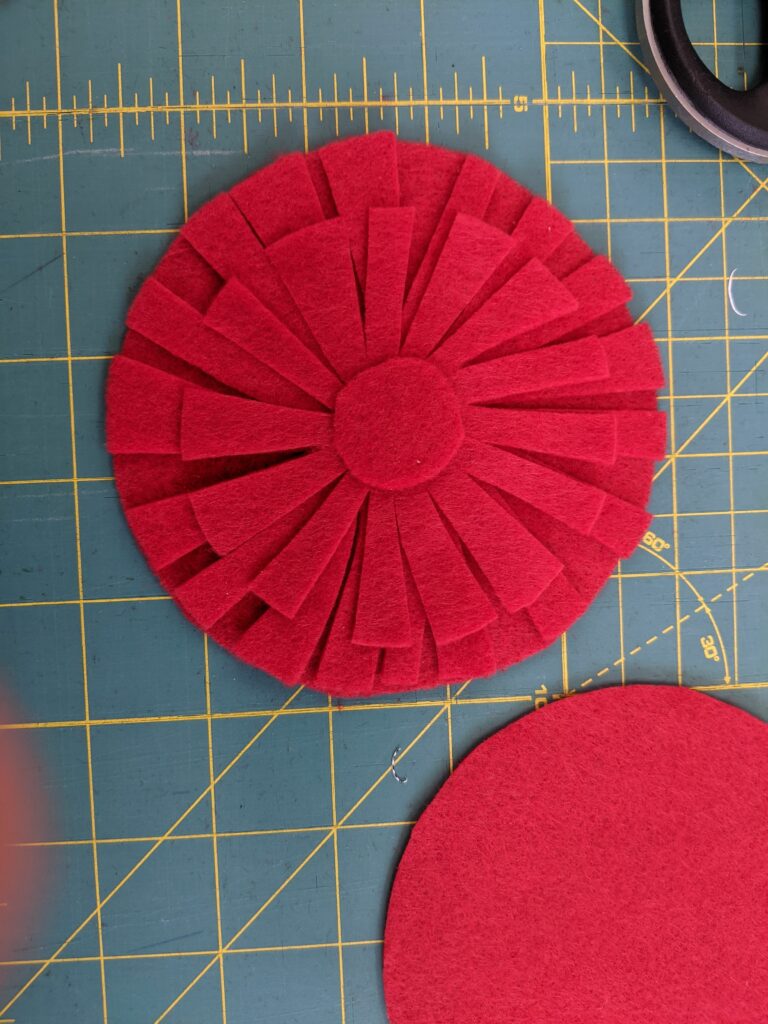
Step 2: Sew both “Pattern piece F” together, 1 full circle under the cut piece of pattern piece F. We secured it by sewing from one petal of the flower horizontally through the middle to the opposite flower petal. We did this for 6 sets of petals creating a “star like” pattern. We would recommend leaving some of the petal not sewn down to the circular backing. This will make it easier to mount it to your ribbon later.
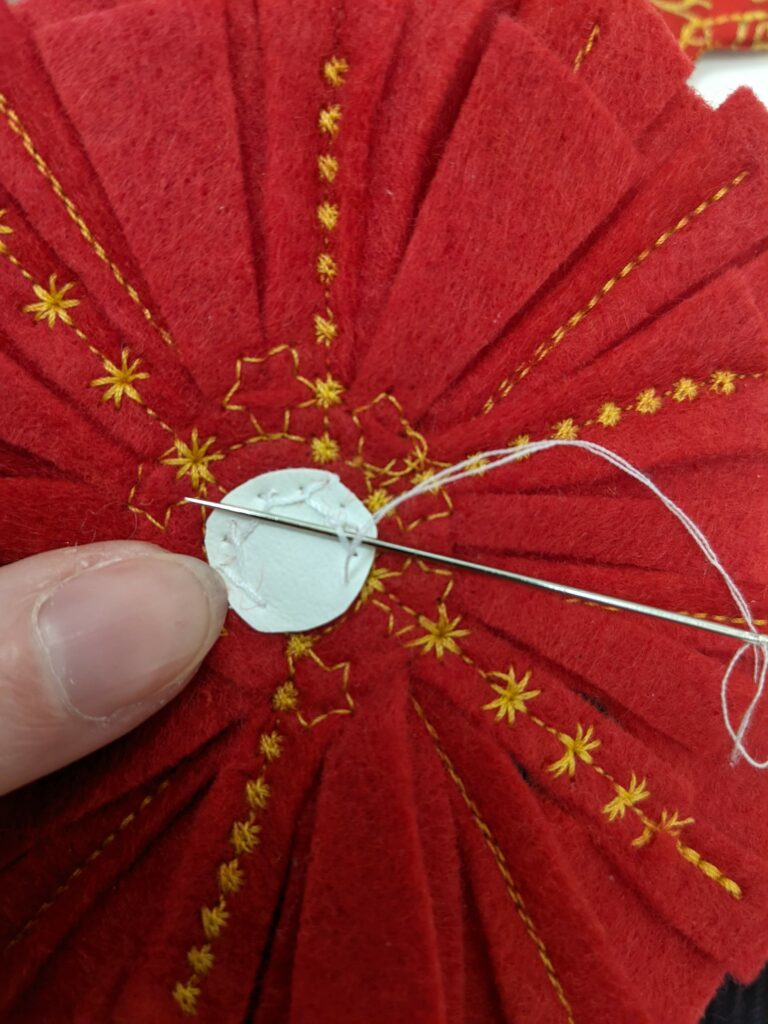
Next, place “Pattern piece G” on top of your sewn together “Pattern piece F.” We started by doing a straight stitch across one of the petals all the way to the opposite side through the middle, sewing through all 3 layers. Then we used an ornate stitch to secure the remaining petals creating a star burst. Last we sewed “Pattern piece H” on top of all the layers using another ornate star stitch. Your felt may be fairly thick by now, so take it slow.
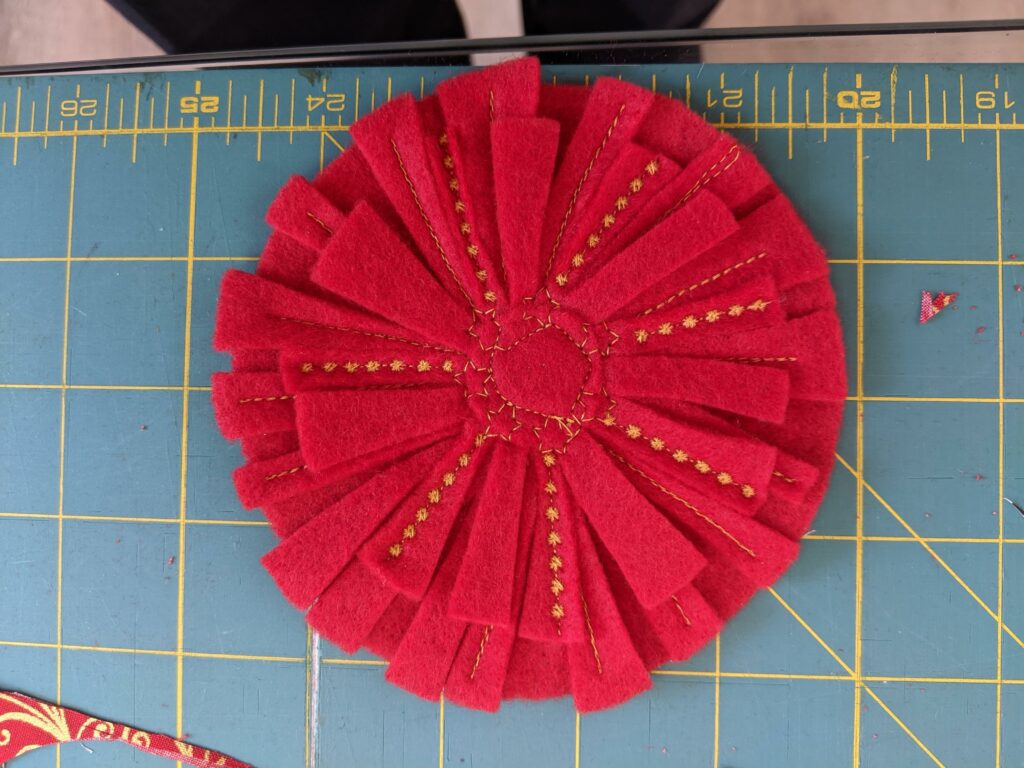
In the end you should have two completed flowers.
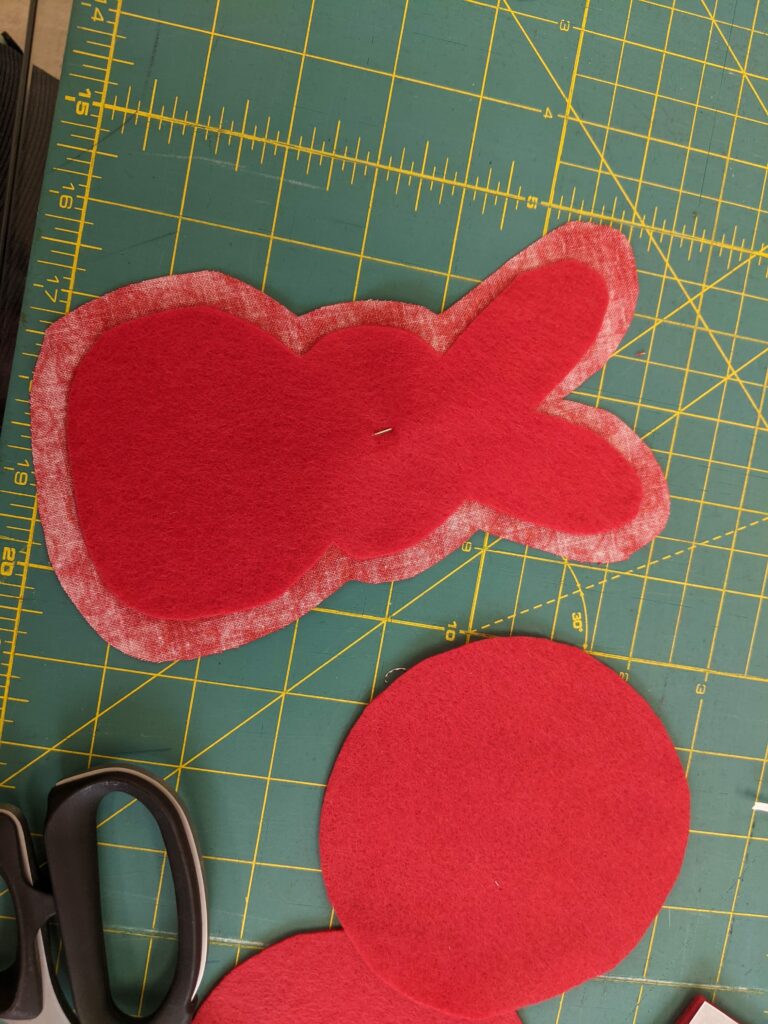
Step 3: Grab your Rabbit pattern pieces! Using your double sided tape, tape down “Pattern piece A” to one piece of “Pattern piece B,” leaving a small edge around the outside as shown. Make sure you tape your felt to the wrong side of your cotton fabric (as shown). Grab the remaining cut of “Pattern piece B” and pin it to the underside of your other “Pattern piece B.” The layers should be thus: cotton, cotton, felt. For both pieces of cotton, the wrong side of the pattern should be facing outwards.
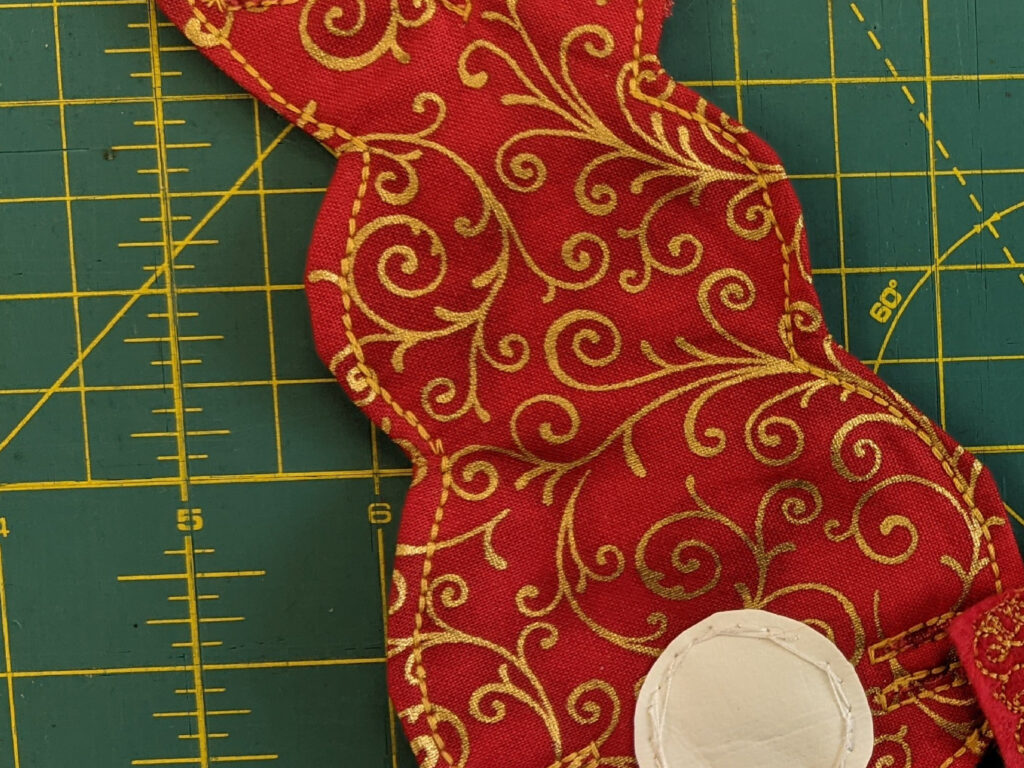
Head to your sewing machine. Using the edge of the Felt Rabbit as a guide, sew around the outside of “Pattern piece A” and through the two layers of “Pattern piece B.” Leave a 3 inch to 4 inch gap at the bottom of the rabbit as shown.
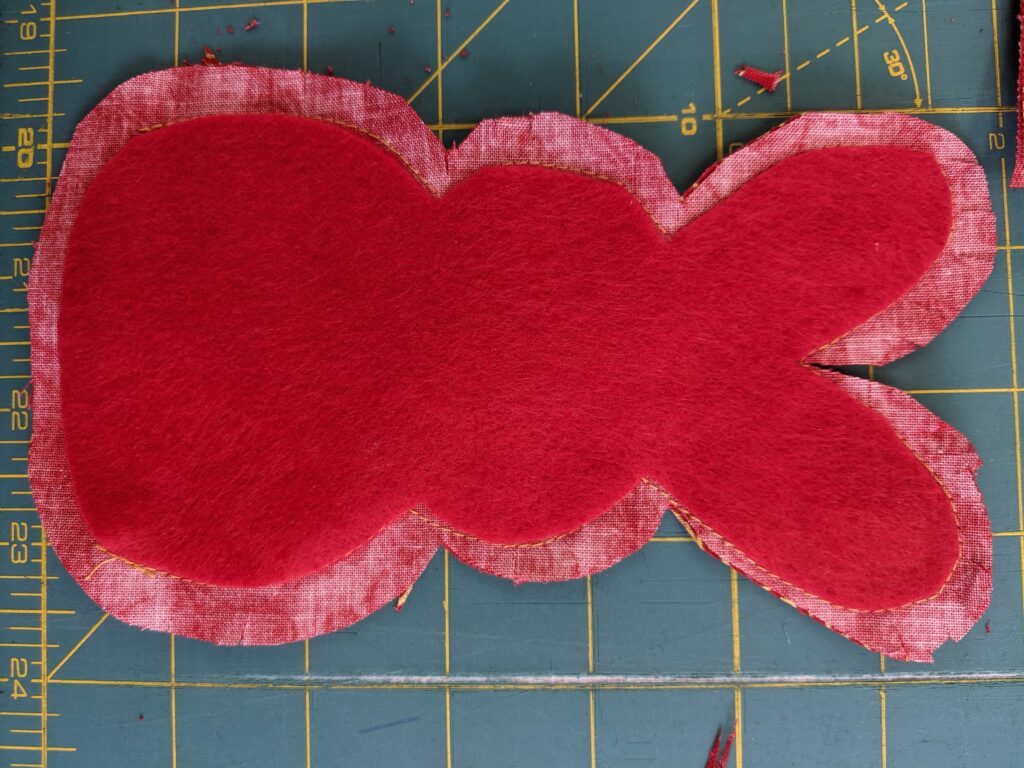
Carefully grade/clip the fabric around all the curves including the Ears, Head, and Torso creating a “fan like pattern.” This makes it easier to turn your fabric without getting extra bulk or awkward angles. To see a more thorough example of grading and turning, see our DIY here and jump to step 3 in the instructions.
Step 4: Turn your Rabbit inside out so your can see the beautiful pattern! Using a hand sewing needle, use a ladder stitch or slip stitch to sew the bottom closed.
Take your Rabbit back to the sewing machine. We used a “3 stitch straight stitch” for this next step, but you can use a regular straight stitch as well. Starting about 1/4″ in from the edge, top stitch around the outside edge of your Rabbit. You should be sewing through all three layers at this point.
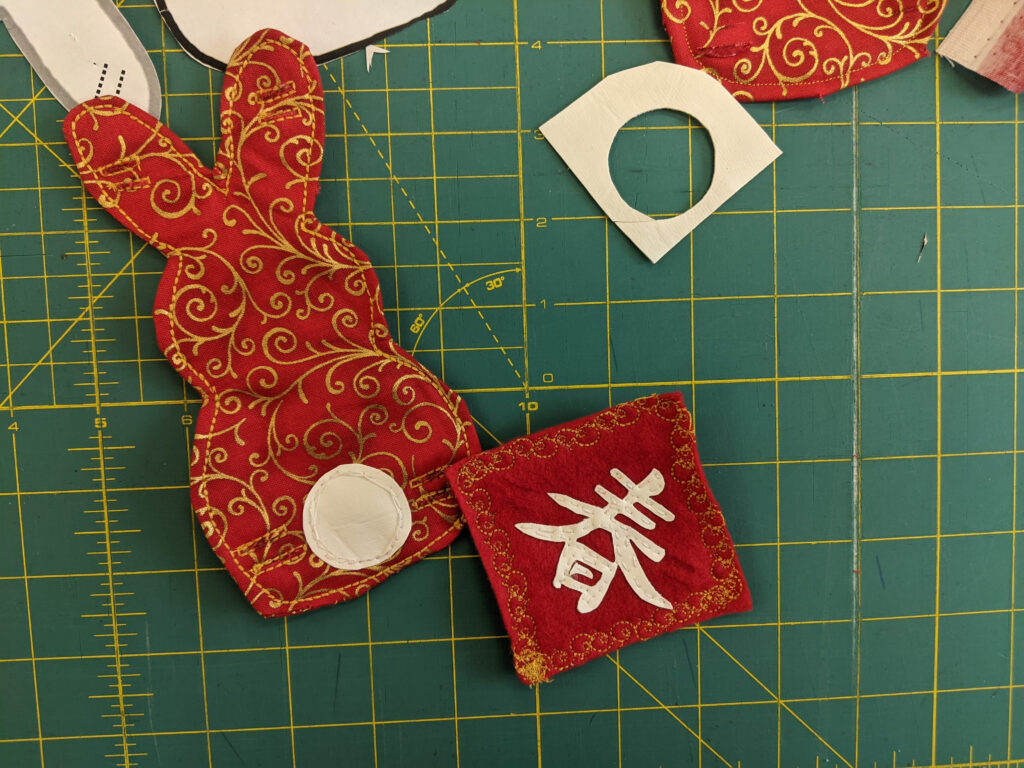
Step 5: Get your two cuts of “Pattern piece D” and sew them together. We used an ornate stitch design, but a straight stitch works too! Try a double/twin straight stitch around the outside border. Just make sure you’re no more than 1/4″ in from the edge or your sewing lines will get in the way of your ribbon.
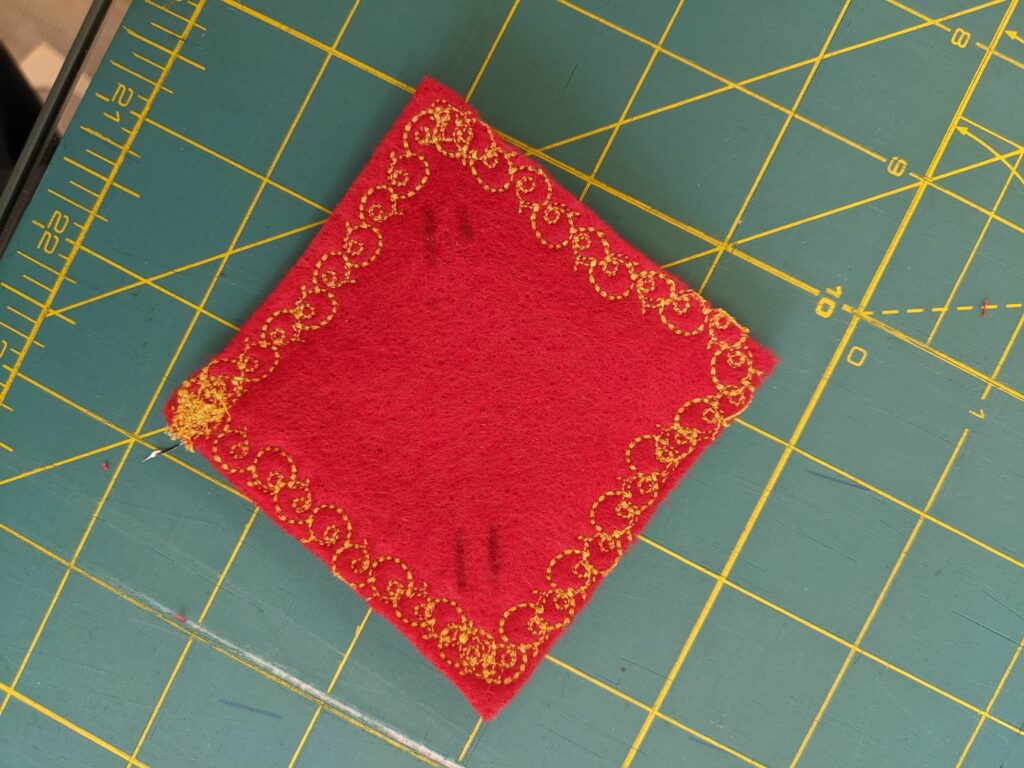
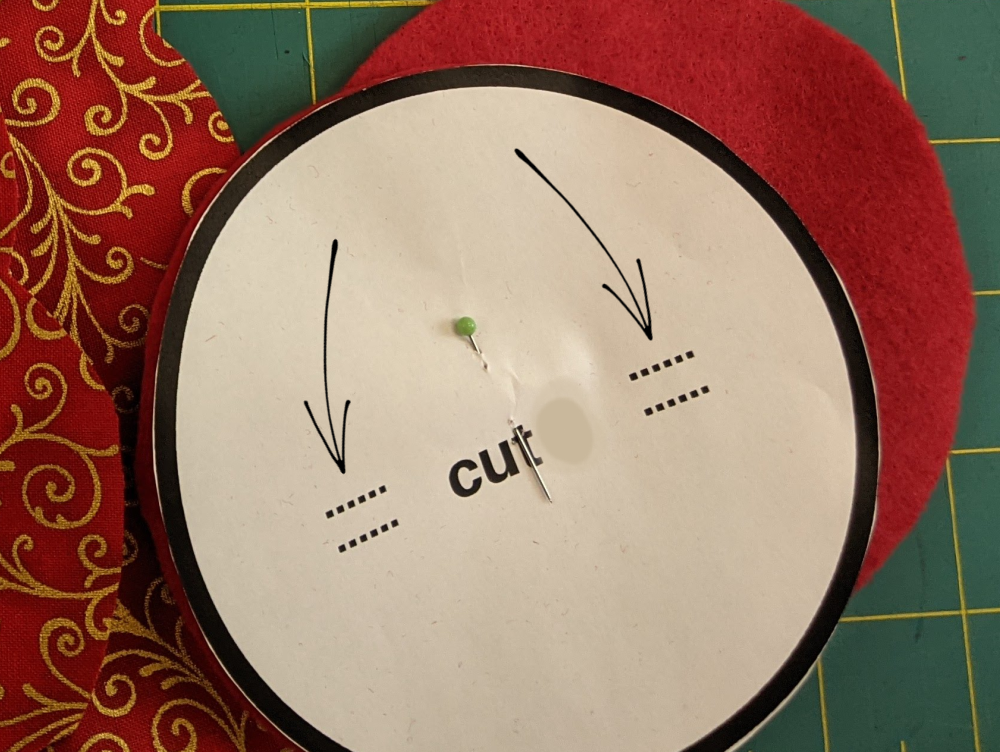
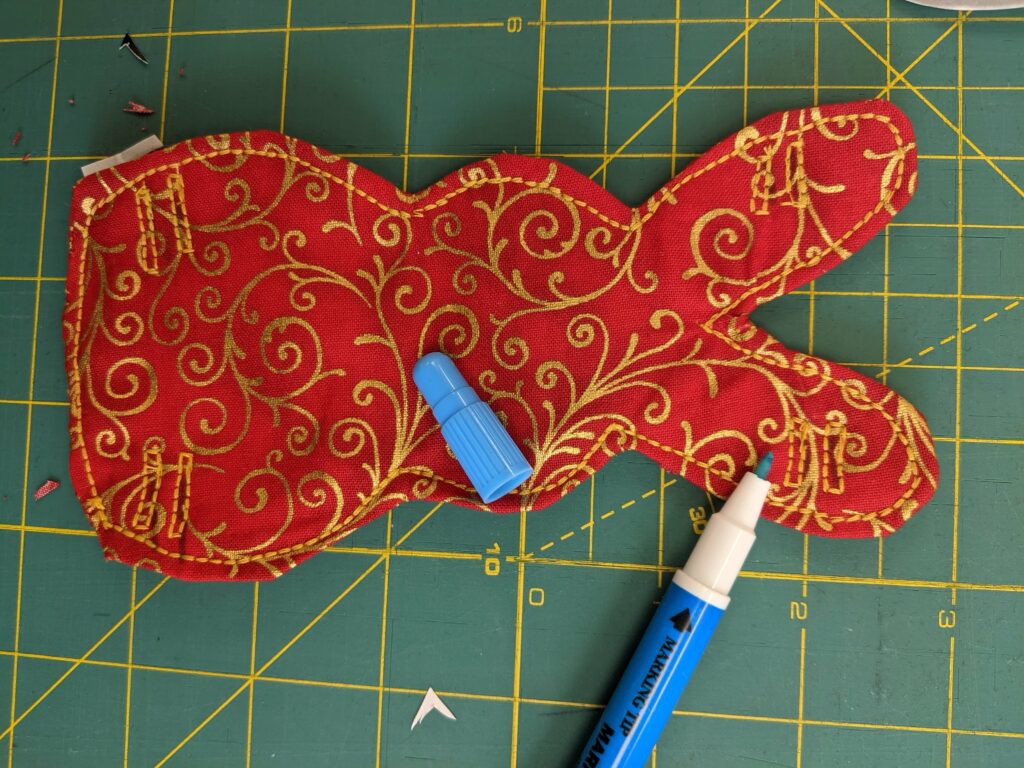
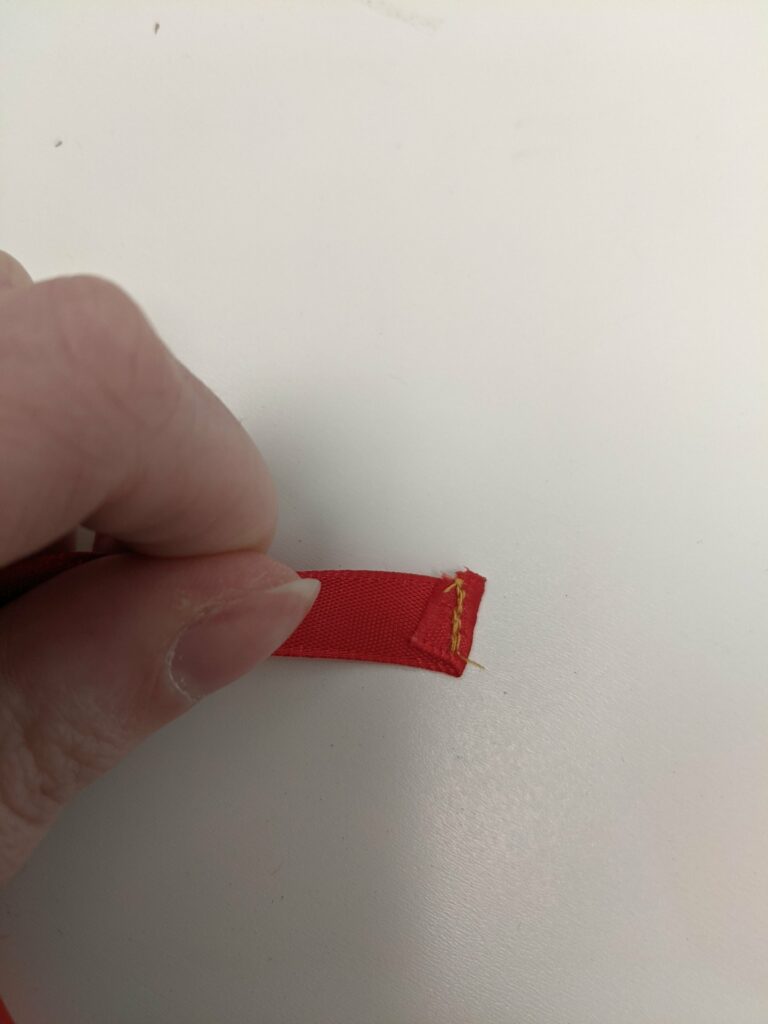
Step 6: Grab your paper pattern pieces again and clip the “dotted lines” on the pieces. Place your corresponding paper pattern on each fabric piece; using Tailor’s Chalk or a Marking Pen make a mark on your fabric. These lines represent where you will eventually cut a slit for the ribbon to feed through.
For your Rabbit, take it back to the sewing machine and create a small stitched box around the line you’ve just drawn. Essentially you are creating a “button hole” so the fabric will not fray. Alternatively you can skip sewing a button hole and instead use Fray-Check.
For your Flower try and coordinate the Ribbon holes to be between the petals. Try not to cut through the petals.
Once you’ve made your marks and created your button holes take a sharp pair of scissors or a button hole wedge and snip through your fabric.
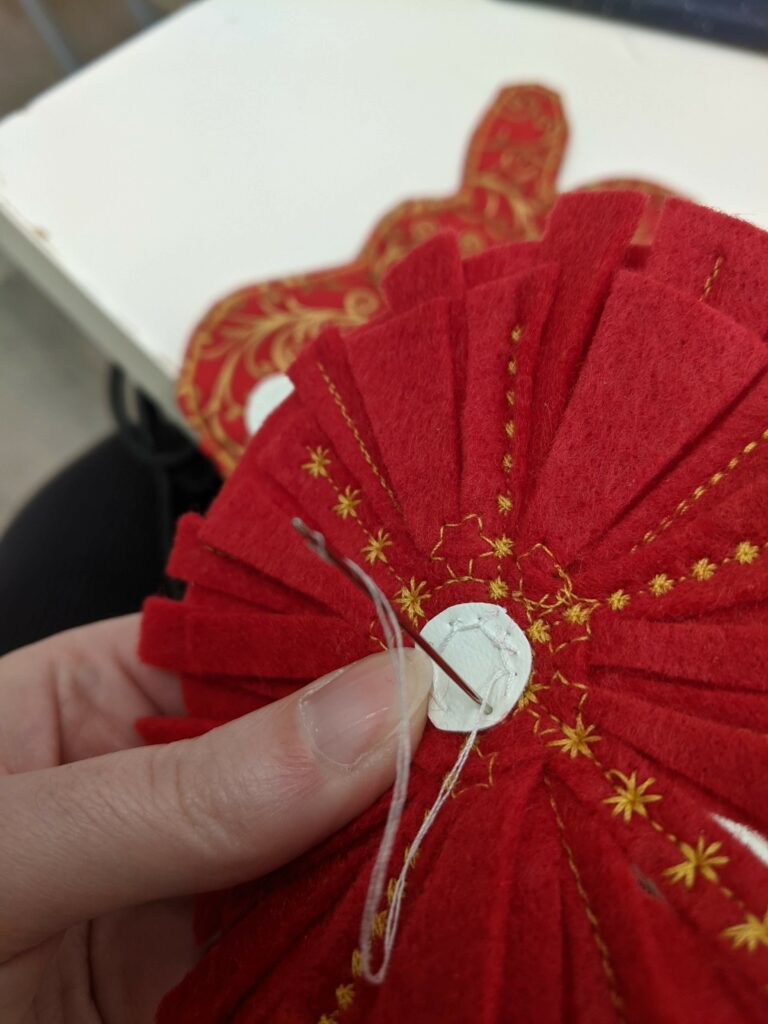
Step 7: For our last sewing step grab your White Felt or White Faux Leather and your hand sewing needle. Using the double-sided fabric tape, tack down the “Spring” Kanji/Chinese Character and the white circles on both your Rabbit and the centre of your flower. Using a hand sewing needle sew using a top stitch technique to secure these pieces in place.
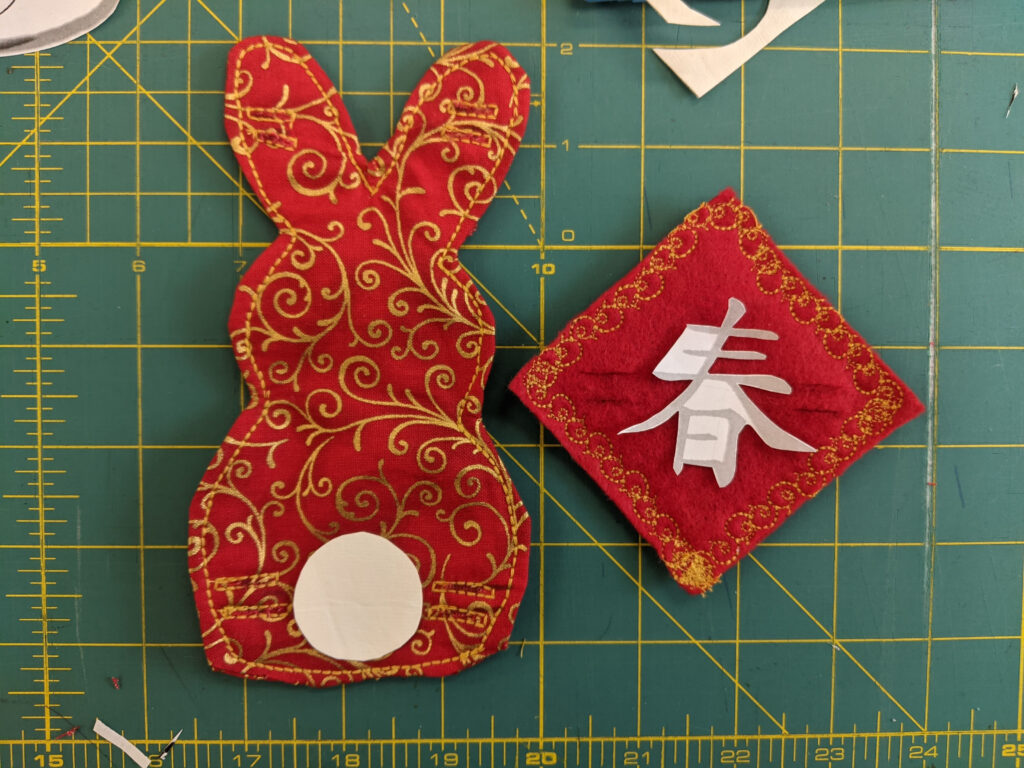
For securing the Kanji/Chinese Character we used a simple straight stitch and carefully sewed it into place.
For the Rabbit Tail and the centre of our flower we used a spiral top stitch technique.
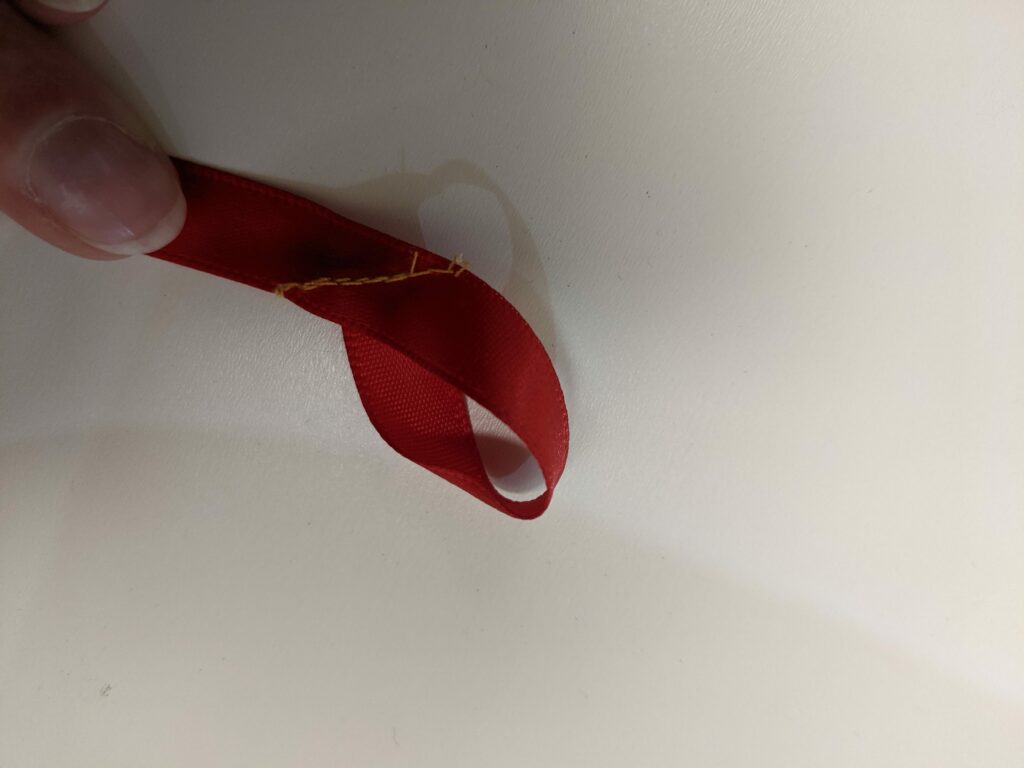
Step 8: Cut your Ribbon in half (so each side is 1.5 yards). Take one end of your Ribbon and your paperclip. Put the end of your ribbon through the paperclip and use the paperclip to “feed the ribbon” through the cuts you’ve made on your pattern pieces. Make sure your Ribbon does not twist and remains flat. Do this for both sides of your pattern pieces and then distribute your ornaments how you’d like along the ribbon length.
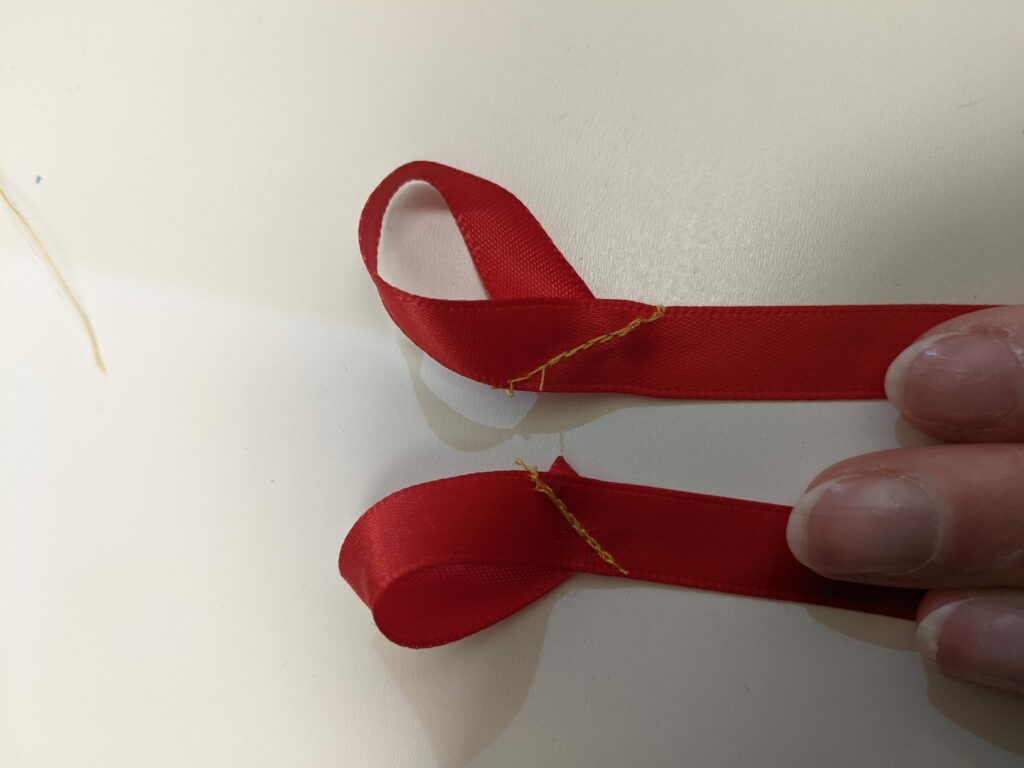
Step 9: Take the end of your Ribbon and sew a hem so it will not fray. For the top of your Ribbon create two loops by turning the Ribbon on itself and securing it to the back of the Ribbon with a straight stitch. Make sure the loops face opposite ways to help your garland hang straight.
Sew a double fold hem at the end of your Ribbon as well.
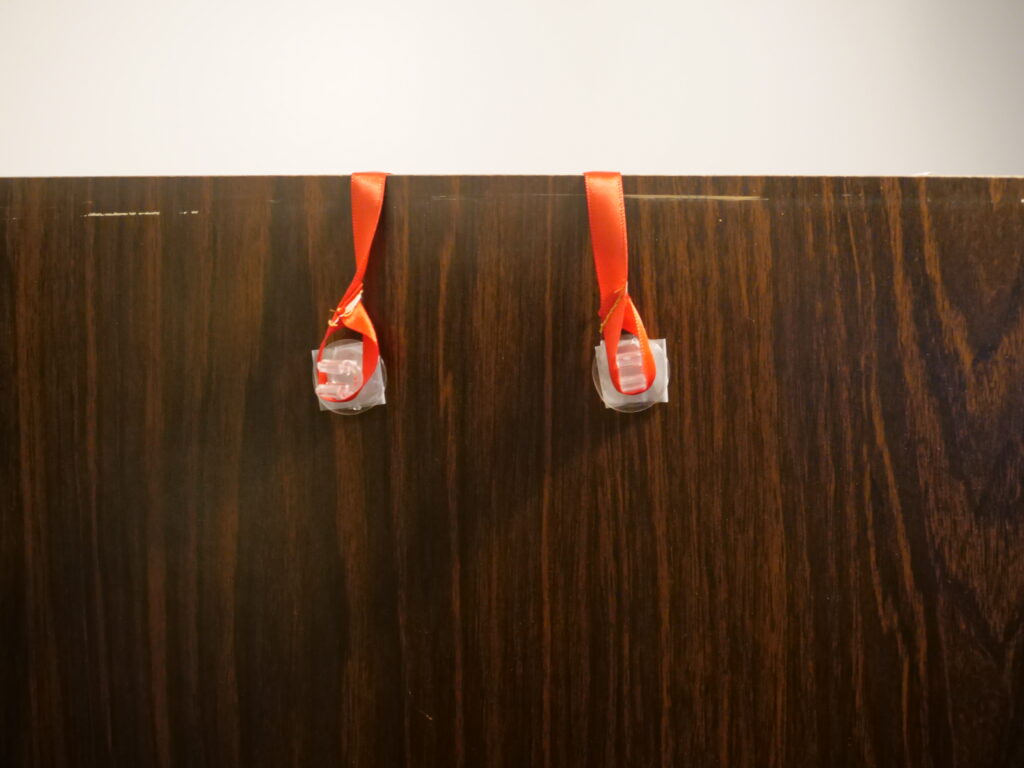
Now you can hang your Ribbon using suction cups on the back of your door or adhesive hooks! No need to hammer into your door or buy a wreath hook!
We hope your enjoyed this tutorial and make a festive Lunar New Year garland for your door as well! We think this Rabbit motif is super cute and would love to see how you made it unique for your door. What do you think? Should we make an animal a year so your can have the whole Zodiac? Make sure to share our blog with your friends or leave a comment to let us know how you did!


