Ready for Easter? Whether you are or not here is a wonderful fun project to do for yourself, or with your young one to have a blast Easter Egg Hunting this year!
This project takes about an hour to do, and is a relatively easy method. The best part? No Pattern Needed!!! You can do this project with scrap fabric or new fabric.
Let’s get hopping!
Tools & Materials:
*Note: These measurements can vary depending on how big you want your basket to be. All measurements are adjustable for your desired size. These measurements create a basket 8” tall, 10” wide across the top, with the ears/handles at 13” finished.
- 1.25 yard of 115 cm wide fabric (Base Basket Colour) this can be a solid or print
- .40 yard of 115 cm wide fabric of Contrasting Fabric (Inner Ear Colour)
- 1 yard of Fuse It Heavy Interfacing
- .75 yard of Pellon (Heavy Hat making Interfacing)
- 2 matching buttons (For the Eyes) size can vary (Sub Felt circles if desired)
- Embroidery Floss in Black and Pink (Colours can vary) (Sub Felt for nose and mouth if desired)
- Pom Pom
- 1 spool of matching thread for Base
- 1 spool of matching thread for Inner Ear/Contrast
- 1 piece Velcro Circle (hook and soft) or 1 Snap
- Fabric Chalk or Disappearing Pen
- Ruler/Tape Measure
- Scissors
- Pins
- Hand Sewing Needles
- Fabric Glue or Glue gun if using the felt face method instead of embroidery
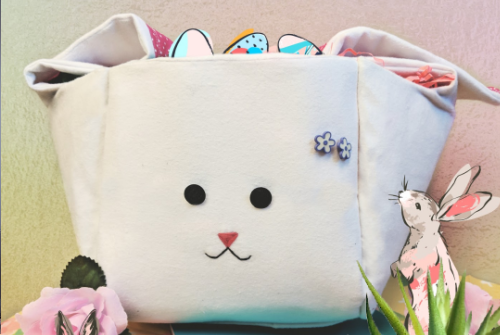
I created a simple white and pink basket with ears just long enough to hold as handles, but you may want to make the ears longer so they can be tied in a knot or a bow. If you’d like to make the ears longer you’ll need more than 1 meter of fabric or a 150cm wide fabric.
Since this project only uses 3 panels you can easily use a patterned fabric or different coloured fabric for the face and the ears of of the bunny!
Here is how I created this simple white bunny basket.
Instructions:
Step 1: Lay out your base fabric on a flat surface. Keep fabric folded so you will get a facing and a lining out of your fabric. Cut out two squares at 14” by 10” (square A) and two squares at 13” by 21.5” (square B) as seen below.

Step 2: Cut out your interfacing. Cut the Fuse It into 4 pieces each at 7.5” by 12”. Cut the Pellon into 2 pieces each at 8.5” by 13.75”.
The Pellon should be about ¾” smaller then your Square A on 3 sides and 2” Smaller on one of the 10” sides. This will make it easier to sew and hem later.
The Fuse it should be about ¾” away from three sides, places on the salvage of the fabric. This will allow the ears to be soft and the base to be firm. The Fold of the fabric is the top part of your ears.


Step 3: Iron your Fuse It Interfacing to the Wrong Side of your fabric at the bottom of Square Bs, closest to the salvage (the part of the fabric farthest from the fold). Do this on both Cuts of Square B, at the wrong side of the salvage.
So when you fold the fabric the interfacing is touching one another at the end of the wrong side. This will leave 14” of uninterfaced fabric above each square on both sides.

Step 4: Measure and draw out your inner ears to be 13” by 5.85”. This can vary depending on how much contrast you would like. Draw on the wrong side of the fabric only. Cut!

Step 5: Sew a single hem on the inner ears to allow for a clean edge.

Step 6: Sew your Contrasting Fabric onto the Right Side of Square Bs, centered on the Uninterfaced section. The stitch will be seen so choose your thread accordingly.


Step 7: Turn Square Bs inside out so the Right Sides are touching. Then sew together, tucking in close to the Contrasting fabric. This will create the “Ear” shape. Be sure to sew the interfaced section square both on the sides and the top of the interfacing, leaving the bottom/salvage open. If you’re nervous about getting the shape right, trace out with Fabric Chalk or Disappearing pen what you’d like the shape to look like.


Step 8: Cut the excess fabric away from the Ear shape. In the curved part directly above the interfacing, leading to the ear shape, cut notches to allow for an easier fold.

After cutting out it should look something like this:


Step 9: On the wrong side of the fabric of Square B draw out with Chalk or Disappearing Pen a rough arch from the bottom of the salvage to the top corner of the interfaced section.


One side of the Square arch should be 4” from the edge and the other side should be 3.35” away from the edge.
Do this to both Pieces of Square Bs. Be sure when you draw out the arch that 1 piece of Square B is mirroring the other piece. Imagine placing your hands together to clap: your fingers are an exact mirror of each other. Image your pinkies are the 4” cut arch and your thumbs are the 3.35” cut arch, leaving your middle finger to be the ears of the basket.
Step 10: Sew just outside of the line you’ve drawn on Square B along your arch. Cut away the excess fabric. You should have a rough basket shape.

Step 11: Take Square A and the Pellon you have cut. Place the Pellon on the Wrong side of one of the Squares and sew the two sides together, leaving an opening on one end to allow the square to be turned inside out. Creating a “tube” shape.
Do this for piece 1 of Square A and piece 2.

Step 12: Turn both Square As inside out so the seams are hidden. Cut off any excess Pellon away from the open mouth of the fabric tube.

Step 13: Double Hem the open mouth of both Square As to allow for a smooth close.

Step 14: Take your two pieces of Square A and lay them on top of each other so there is a 3.5” overlay in the middle. Creating one large “strip”. If your strips do no lay flat, don’t worry. You want it to bend later anyways.
Pin the fabric together first before sewing to be sure they are the right size on both ends. The overlay in the middle can vary depending on how accurate you made your hem and seams. The finished length should be roughly 23” from end to end.

To test if a 3.5” overlay is enough pin the fabric in the middle and “fold” like a “rainbow”. Hold the rainbow shape to Square B and see if it folds comfortably along the curve/arch you’ve created. Adjust as needed.
Step 15: Sew the Square As overlays together. This will create a sturdy bottom so the basket will stand on its own. This can get a bit tricky since the Pellon is so thick and you’re sewing layers of it. Go slow and make it as even as possible.
A trick I like to use is to start sewing about 2” from the corner and reverse backwards to the top corner of the overlay, then stitch normally until you’re finished.
At the end you should have a square in the middle of the bowed strip. This strip is the “face” of your Bunny and the “back”.
Step 16: Finish the bottom of both Square Bs by creating a false seam/hem. Fold the fabric in on itself and pin shut, then sew.

Step 17: This step is the most finicky due to the layers of interfacing you’re sewing through. Be sure you’re using the right needle to sew through this thickness! If you’re not sure what needle to use, check our blog and read through the “How to Select the Right Needle” tutorial.
You should by now have 3 pieces of fabric, the “bow” shape acting as your face and back, and 2 sides acting as your ears.
Take one side, with the inner ear/contrasting fabric facing out and pin it along the side of the “bow shape”/Square A. Be sure the Right Sides of the fabric are together so the seam is on the inside of the basket.
Do one side at a time, do not pin both sides at once.

A trick I used was to sew from the top corner to the bottom and across the bottom on one side, stop and tie off. And then turn the basket around and start from the other top corner to the bottom and tie off. This allowed me to get a clean seam without having to turn the basket around multiple times.
Step 18: you then should be able to turn the basket inside out and have a standing shape!

Select your buttons and hand stitch with matching thread to the front of the basket. Use your embroidery floss to create the mouth, and the nose. And attach a pom pom to the back of the basket with your matching thread. If you’d prefer you can use felt to create the nose, eyes or mouth shape. You can either stitch these on or use a fabric glue, or hot glue gun.
Then hand stitch or glue your velcro/snaps on the center of the back and the face of the basket.
I added a bit of extra flare with some Flower shaped buttons. Feel free to add whatever you’d like!
Done! What a cute, and hip-hop-happening basket!


