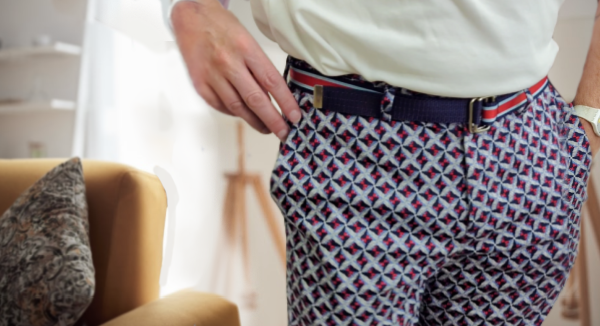
We put together this super simple belt DIY so you can look your fashion best! A little while ago Myles found himself in a snag where he didn’t have a belt that matched his outfit for a formal event! He was quick on his feet and whipped up this easy and chic belt that anyone can make. Sometimes it’s just impossible to find a belt in the colours we need! So why not make it yourself?
Follow along with our 1 minute video and read the instructions below if you need a bit more guidance.
What you’ll need:
The length of your webbing and 2 ribbons should be the same, and how much you need is dependant on your waist size. Measure your waist snuggly and then add 7″ of length to allow for trimming and the tail of the belt. (Eg. If you have a 36″ waist, buy 43″ of webbing and ribbon).
- 1” wide webbing (matching thread for bobbin)
- 5/8” wide grosgrain ribbon (plus matching thread)
- 3/8” wide grosgrain ribbon (plus matching thread)
- (That’s 3 spools of thread in total!)
- Pair of 1” D-rings or rectangular rings
- 1” belt tip
- Needle nose pliers
- Zipper foot (optional)
Our video guide:
Sewing instructions:
Step 1. Once you’ve picked out the colours you will be using for your webbing and ribbons sew your Middle Colour Ribbon on top of your Webbing. Sew with the bobbin thread matching your Webbing Colour and the needle thread matching your Ribbon Colour.
Sew down the centre of your ribbon, turn at the end and sew across, and then sew down both sides of your ribbon. Backstitch at the end.
You should have 3 sewn lines on your ribbon to hold it in place.
Step 2. Switch your needle thread to match your Top Colour Ribbon and place it directly overtop of your “centre sewn line” of the Middle Ribbon. Sew only two lines down the side of your ribbon using the same method mentioned above.
Step 3. Put your zipper foot on your machine or adjust the needle position (like we did in the video) to accommodate sewing the D-rings on. How far you need to move your needle over will depend on your machine, the size of D-ring you’re using, and the type of foot you’re using. Just make sure the needle won’t hit your foot!
Step 4. Trim off the end of your belt to get a clean edge. Fold the end of the belt so the trimmed end is concealed under the length of webbing and then loop the belt end around your 2 D-Rings. The end of your belt should be snug against the D-rings, but they should be able to move easily still. (We are using rectangular brackets in our belt project, so for sewing the D-rings make sure the flat edge is the part your belt is looped around and the curved end is exposed).
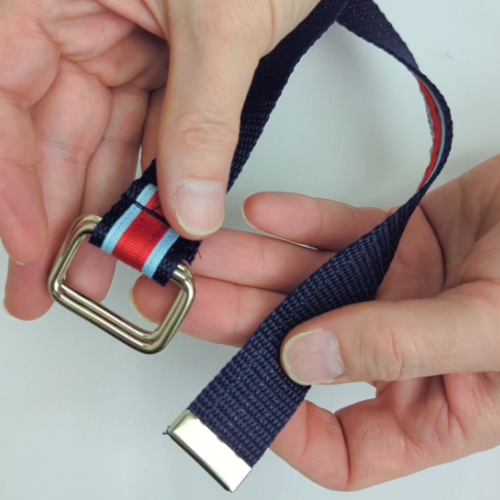
Sew across your belt end securing the raw edge inside and the D-Rings in place. Make sure to backstitch and forward stitch a couple times to make it secure.
Step 5. Trim off the other end of your belt for a clean edge and grab your Belt Tip and Pliers! Using just your fingers to start, press the Belt tip into place at the end of your belt, then use the Pliers to squeeze firmly and secure it in place.
Now you have your very own, super easy to sew belt perfect for your ‘fit. Let us know if you found this tutorial helpful, and what colours you’re going to make your belt out of! If you loved the video, be sure to give it a like and some love so more people can learn how simple it is to make your own belt.


