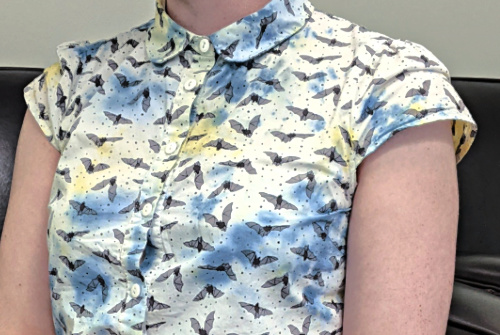
Do you have an article of clothing that you love but you just can’t get a stain out of it? Well I definitely had that problem with one of my favorite white shirts with little bat motifs on it. There was a wash stain on the collar and I just couldn’t wear it like that! So, what can you do when you’ve tried every product under the sun to remove stains?
Why not try Tie-Dye!
What you’ll need:
- Fabric Dye (you can purchase cold wash, hot wash, or synthetic dyes to get the job done. Fabricana carries cold wash powder dyes and hot wash powder dyes!)
- Article of clothing, or fabric you wish to dye (make sure this fabric is as close to 100% cotton as you can get. The more cotton fibers, the better the dye will take. There are synthetic dyes that work on synthetic fabrics, but there is no guarantee that they will take)
- Water
- 2 glass jars
- Large elastic bands or string
- A bucket (one you do not mind getting stains on)
- Stir Sticks (I used chopsticks)
- Eye dropper (optional)
Steps to get your Tie-Dye ready to go!
Step 1: Prep your fabric or clothing as indicated by the Dye instructions on the pack. For us, we had to wash the fabric and leave it damp before starting. We then mixed the dye as the instructions indicated on the package (we used two colours and had a cold wash dye). Make sure you wear gloves! (I didn’t and I regret it….)


I used two glass jars to mix my colours. This way I was able to save the excess dye easily and avoid spillage.
Step 2: Scrunch your fabric up and tie together. I used some leftover yarn and some elastic bands to get the desired shape I wanted. Tie it together tightly, but be sure not to cover too much surface area with the elastic bands/string because it will cut into your design.

Step 3: Put your fabric in the bucket and grab your eyedropper! I wanted to be more precise with my colour placements on my shirt so I used an eyedropper. You can do this with a paintbrush, or by carefully pouring the dye over the fabric.
With the eyedropper technique I was able to select a controlled amount of dye to put on my fabric and avoided “cross colour blending”. It is also always a good idea to start with the lighter colour dye you are using so you don’t get cross-contamination on the colours.


Whatever works for you! Just be sure if you are pouring the dye over the fabric that you don’t let too much collect at the bottom of the bucket. You might get some muddy colours that way.
Step 4: Turn your fabric over and repeat the dying process on the other side. Let rest for 1 hour or until mostly dry to the touch. The longer the better.
Step 5: Remove the yarn and elastic bands and take a look! I decided that I wanted more colour on my garment and scrunched the fabric back up and repeated the dying process the same way as before.
Once you are happy with how your dye looks, let the garment fully dry. Throw it in the dryer to lock in those colours! Be sure that the first time you wash your garment that you wash it with cold water and alone so any excess dye will not stain your other clothing.

And there you have it! A fun tie-dye shirt to cover up any of those pesky stains! Share your creations with us. There is so much possibility for fun colours and patterns with tie-dye!


